用Defold做遊戲, 大家一起來吃生魚片吧…
筆者過去曾接觸過 SpriteKit、LÖVE、Godot 與 Unity 等遊戲引擎。它們各自有不同的特色,也適合不同類型的開發需求。
- LÖVE:使用 Lua,語法簡單、容易上手;但主要以程式碼開發為主,沒有完整的視覺化 IDE 介面。
- SpriteKit:與 Apple 平台整合良好,適合 iOS、iPadOS 與 macOS 遊戲開發;不過平台限制較明確。
- Unity:功能完整、資源豐富,能處理 2D、3D 與跨平台專案;但對只想製作小型 2D 遊戲的需求來說,專案與編輯器相對龐大。
- Godot:同時支援 2D 與 3D,也有完整的編輯器;不過筆者對它的腳本語言與開發方式還不太習慣。
因為這次的目標是製作輕量、簡單的 2D 遊戲,所以最後選擇了 Defold。
Defold 提供完整的 IDE、2D 遊戲開發需要的常用功能,以及語法相對簡潔的 Lua 腳本。接下來就從建立第一個 Defold 專案開始,一步一步做出簡單的 2D 小遊戲吧!
作業環境
| 項目 | 版本 |
|---|---|
| macOS | Tahoe 26.5.2 |
| Defold | 1.13.1 |
Defold 簡介
Defold 是一個免費、開源的跨平台 2D 遊戲引擎,專注於打造輕量級、高性能的遊戲。
- 官方網站:https://defold.com/
- GitHub 專案:https://github.com/defold/defold
核心特色
| 特性 | 說明 |
|---|---|
| 引擎核心 | 使用 C++ 撰寫,確保高效能與低階控制能力 |
| 腳本語言 | 使用 Lua(Lua 5.1 + LuaJIT),語法簡單、易於上手 |
| 輕量級 | 編輯器体积小(<100 MB),遊戲輸出檔案極小(HTML5 可低於 1MB,手機約 3-5MB) |
| 跨平台 | 支援 Web、iOS、Android、Windows、macOS、Linux、主機平台 |
| 開源免費 | 由 Defold Foundation 維護,無授權費、無版稅 |
為什麼選擇 Defold?
比起 Unity 或 Godot,Defold 的優勢在於:
- ✅ 更輕巧:編輯器啟動快、編譯時間短(2-5 秒 vs Unity 的 30-120 秒)
- ✅ 更小的輸出檔案:手機遊戲通常只有 3-5MB(Unity 約 25-50MB)
- ✅ 簡單易用:Lua 腳本語言對新手友善,學習曲線平緩
- ✅ 零成本:完全免費,無任何授權限制或收入分成
💡 適合用途:2D 手機遊戲、Web 小遊戲、輕量級跨平台專案
新建專案
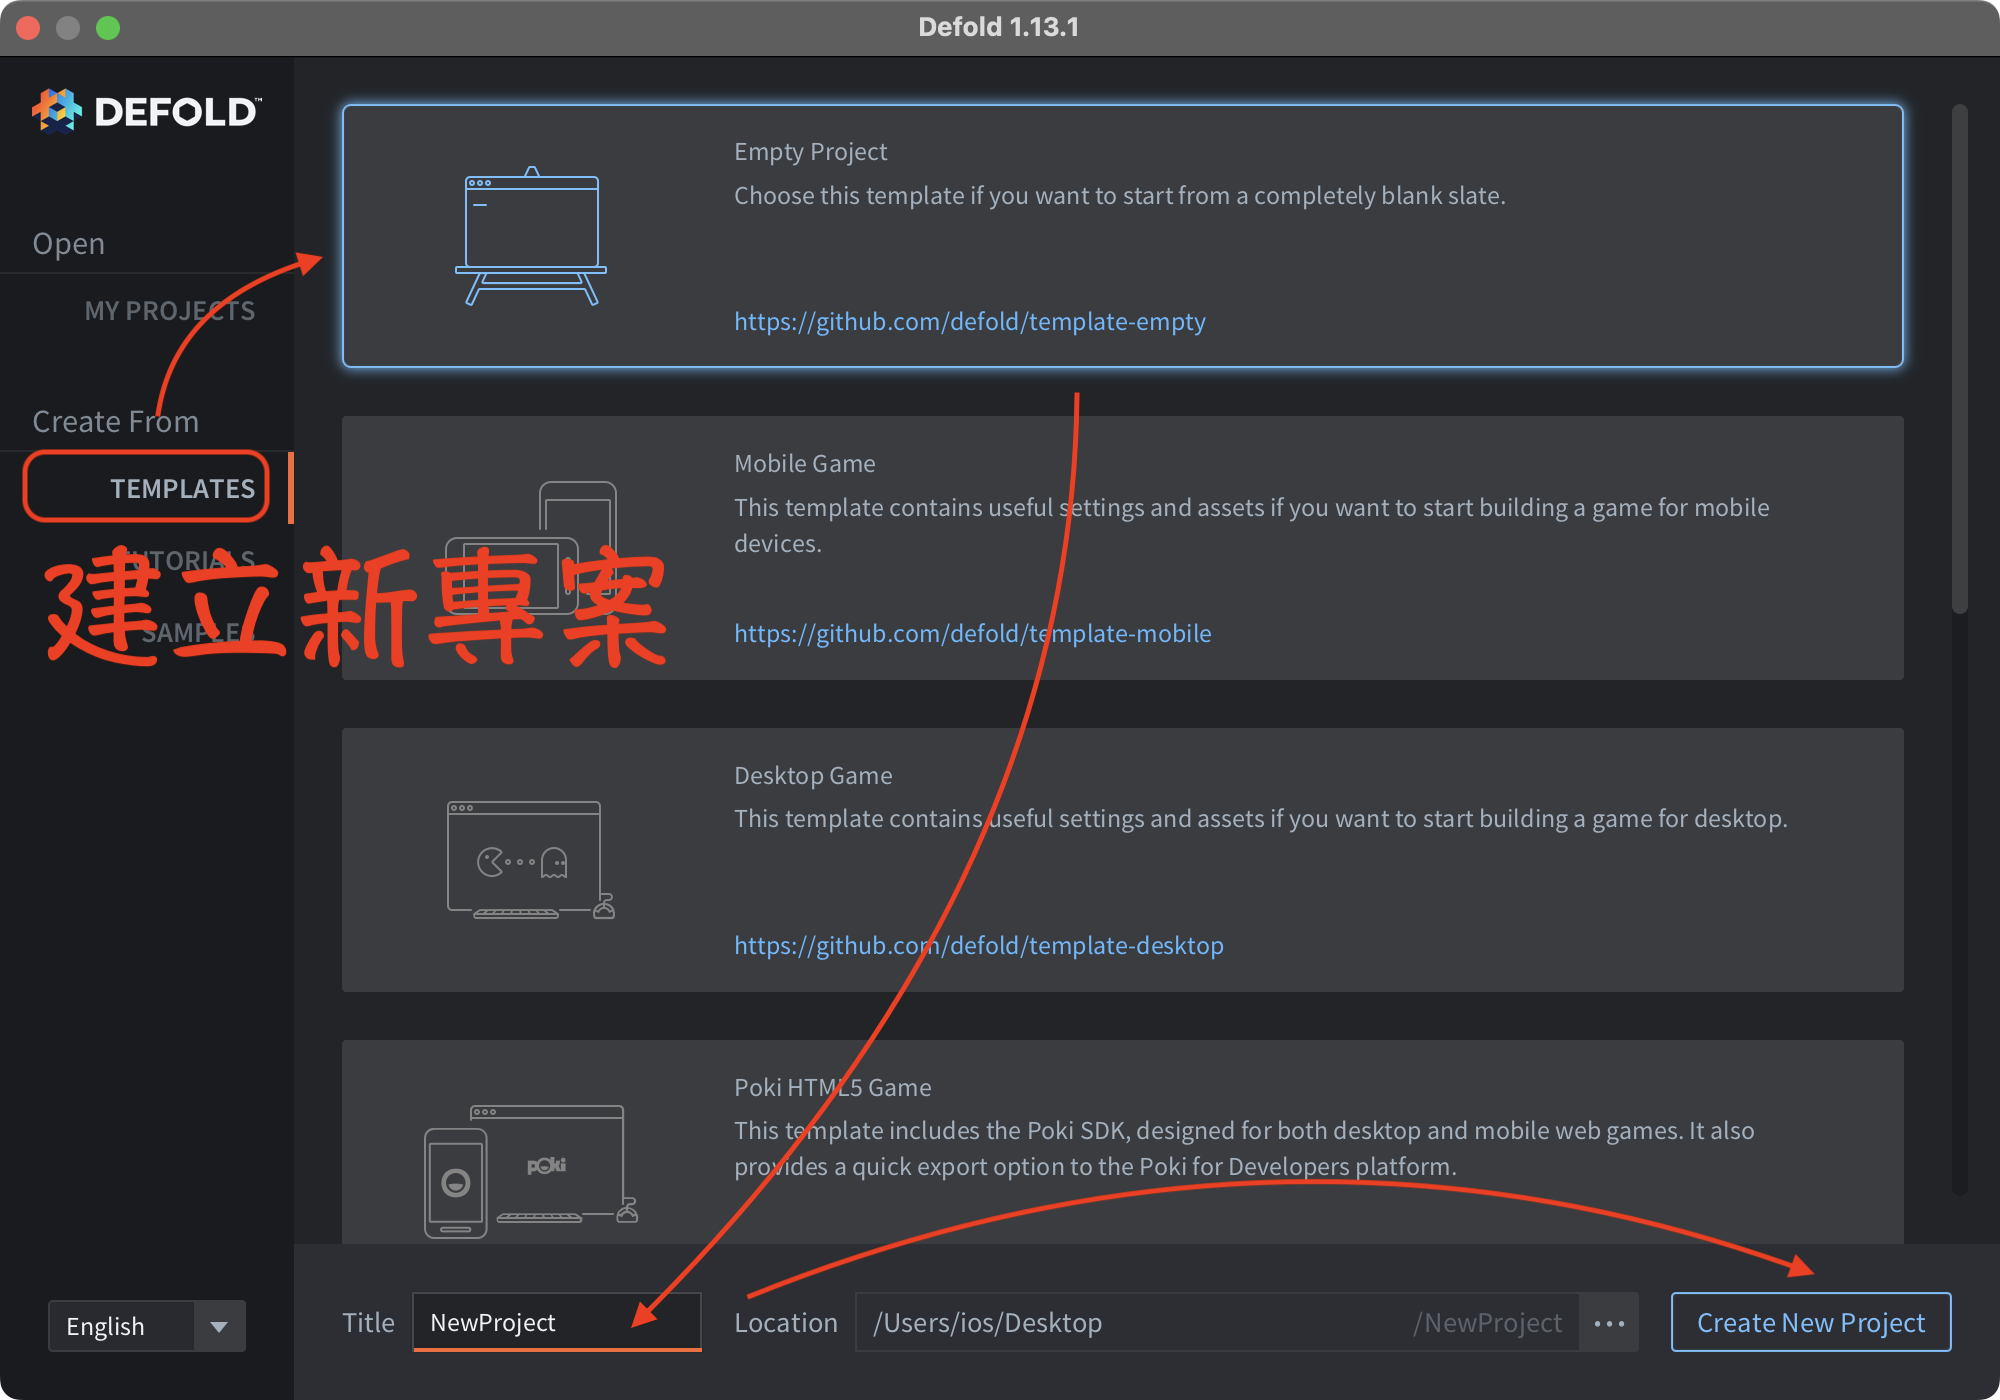
步驟 1:建立空專案
啟動 Defold 後,選擇建立一個新的空專案(Empty Project)。
步驟 2:打開專案設定檔
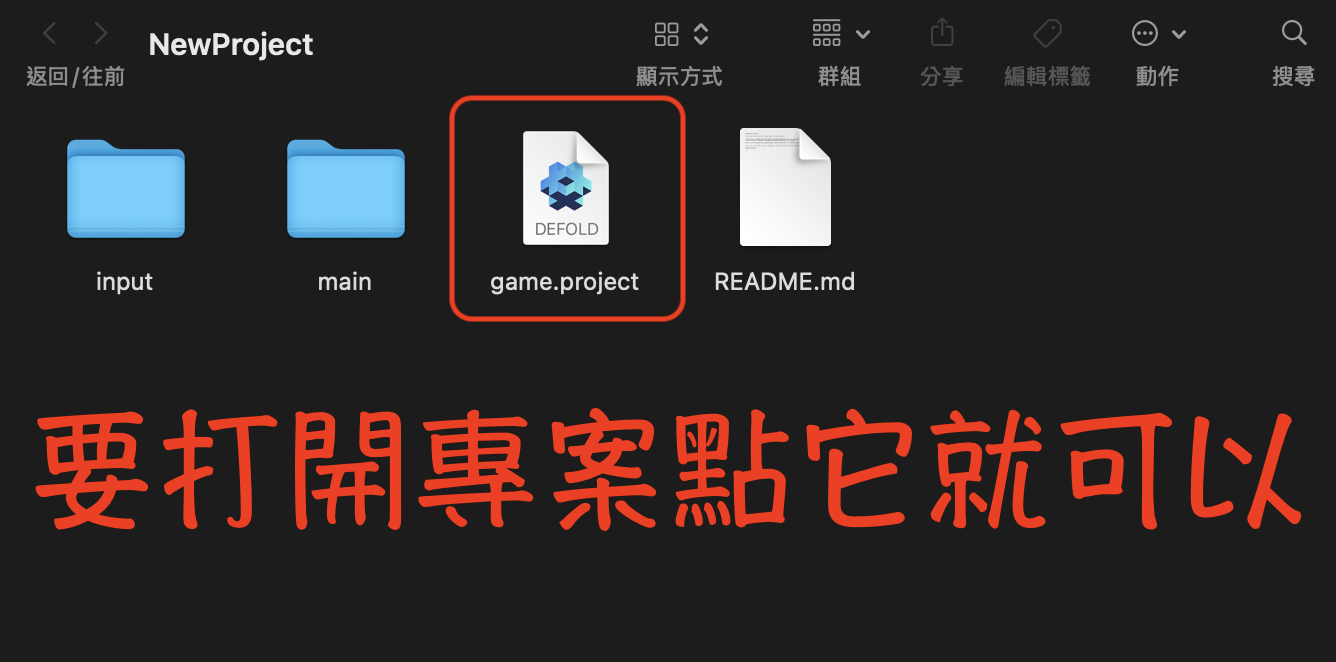
在專案建立完成後,點擊專案根目錄下的 game.project 檔案,即可打開專案設定頁面。
💡 提示:
game.project是 Defold 專案的核心設定檔,包含解析度、標題、模組等全域設定。
步驟 3:認識 Defold IDE 介面
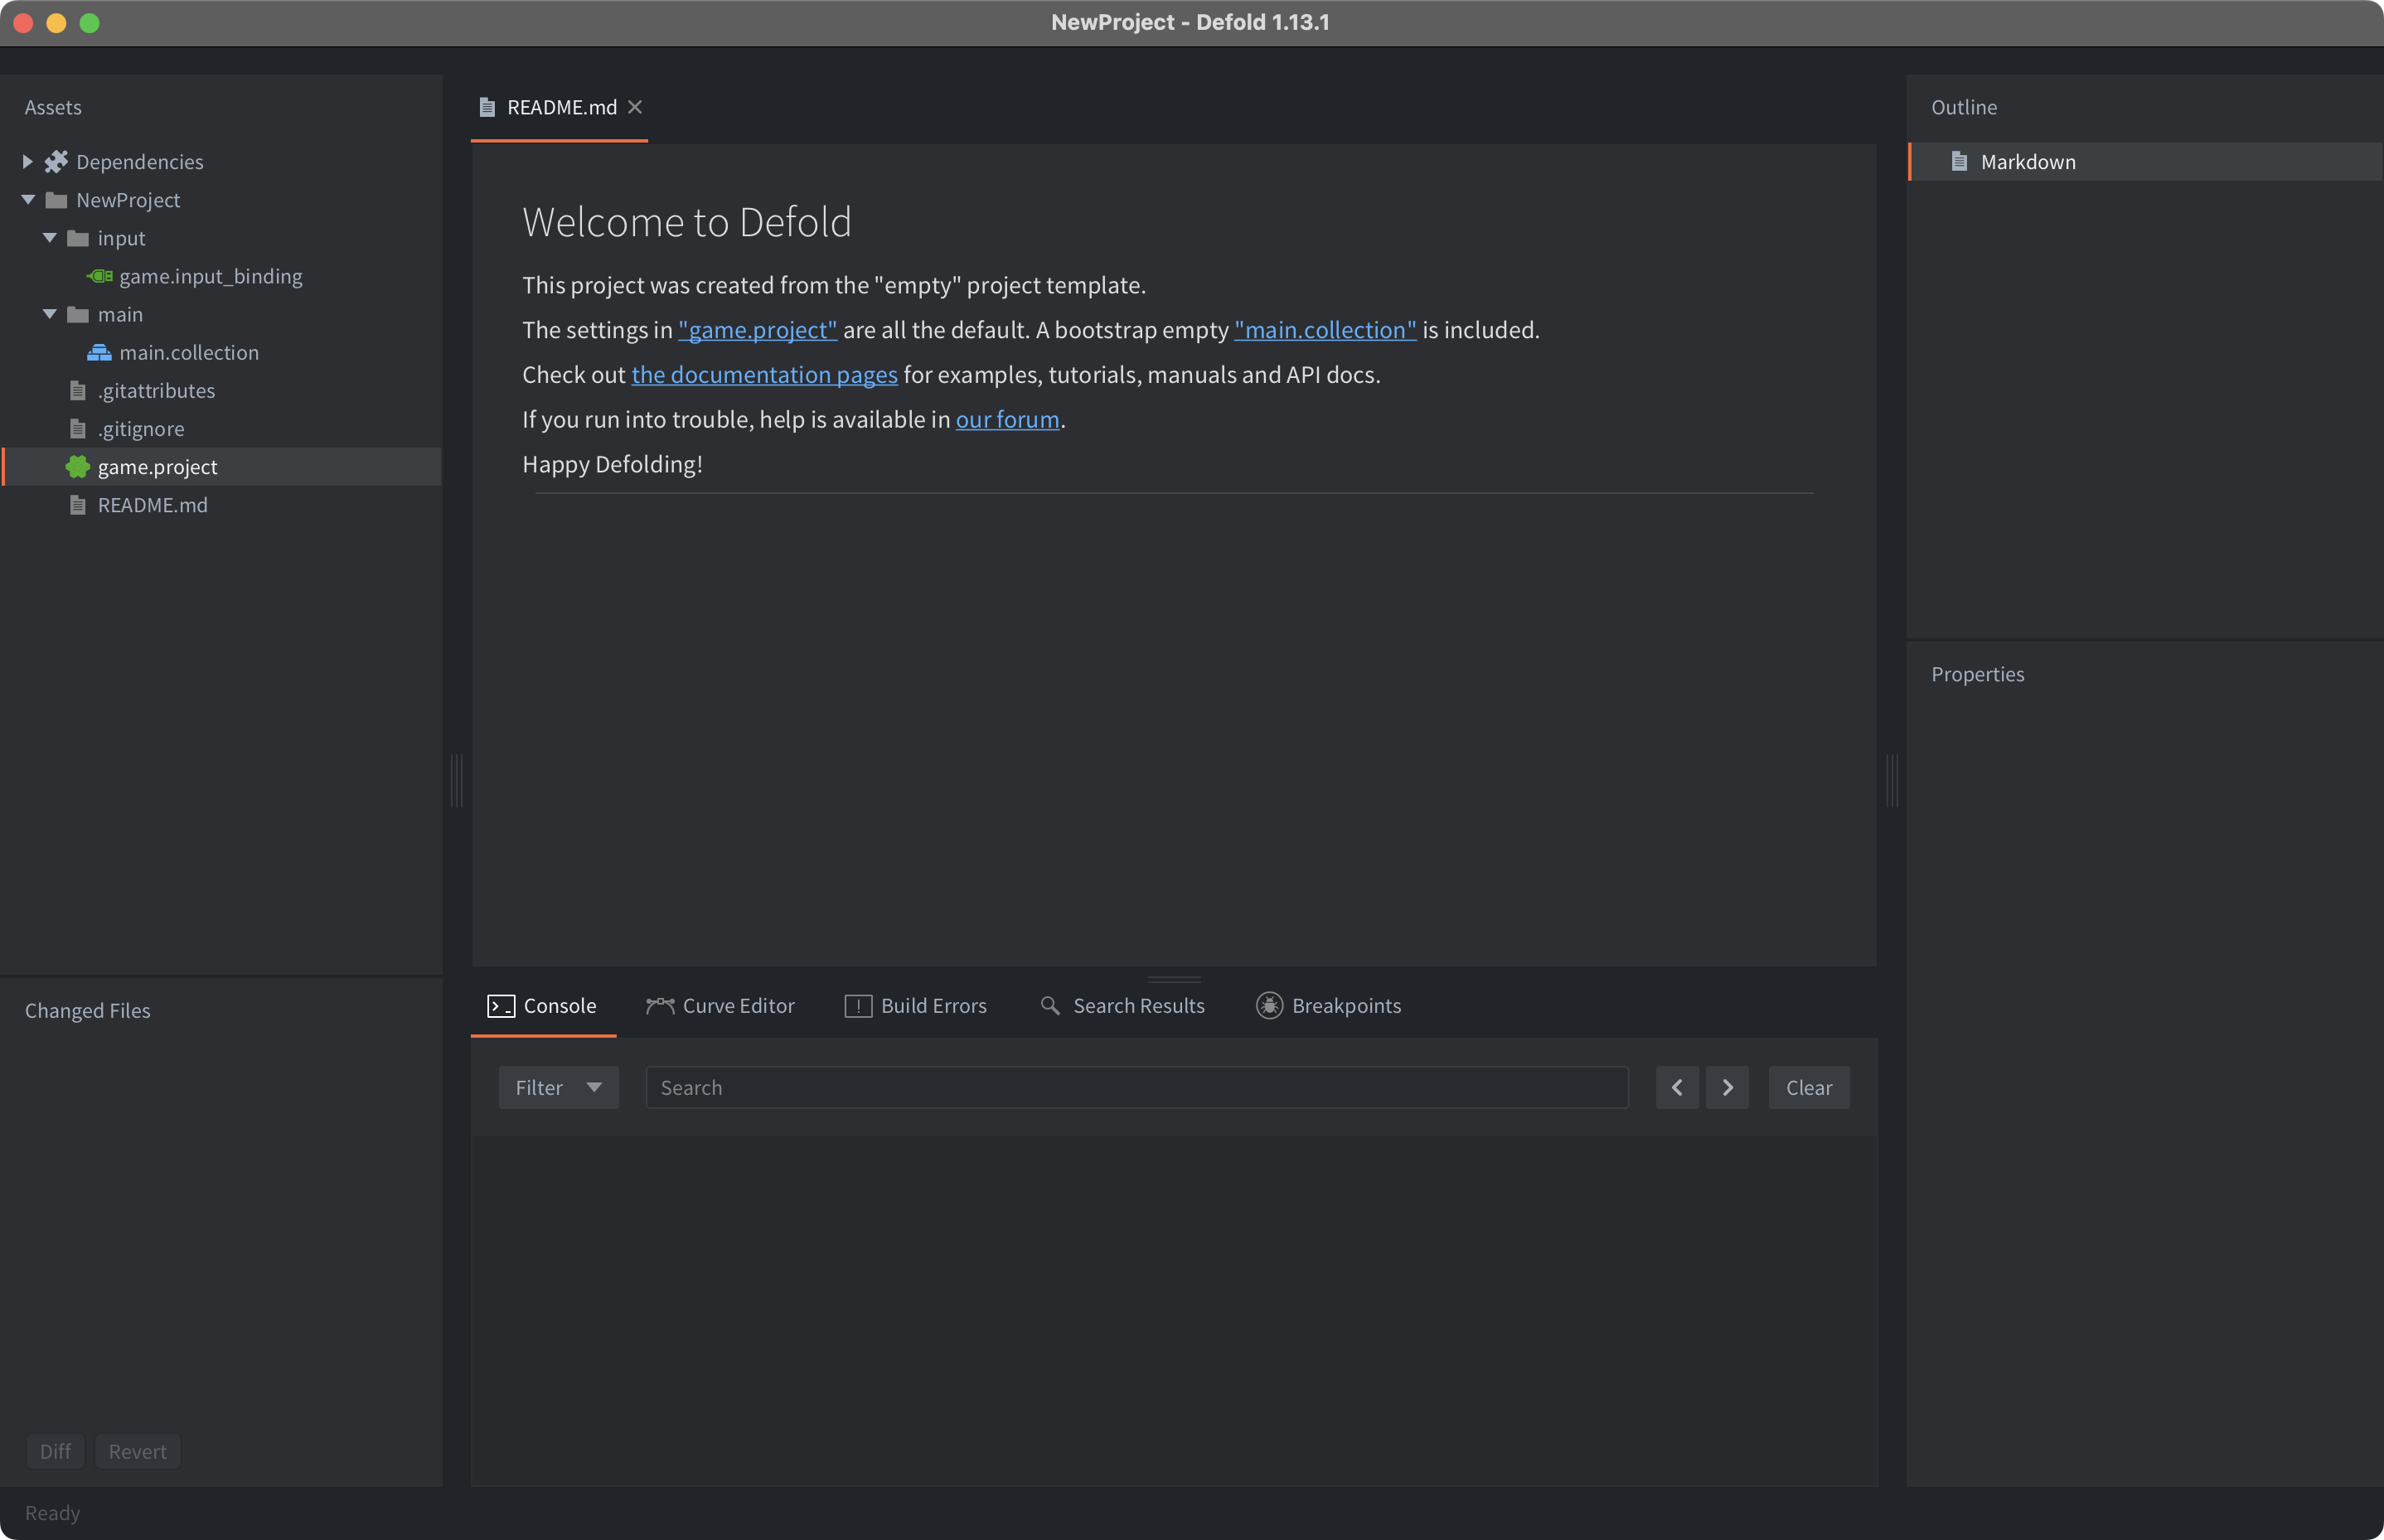
打開專案後,你會看到 Defold 的開發環境介面,主要包含以下區域:
| 區域 | 功能 |
|---|---|
| Outline(大綱) | 顯示專案中的所有檔案與物件結構 |
| Properties(屬性) | 編輯選中物件的屬性與參數 |
| Viewport(視窗) | 預覽遊戲畫面與場景編輯區 |
| Console(控制台) | 顯示除錯訊息與執行錯誤 |
下一步
現在你已經成功建立並打開了一個 Defold 專案,接下來可以開始建立遊戲物件、匯入資源,並編寫腳本程式碼!
建立主角
步驟 1:匯入角色圖片素材
首先將角色的圖片素材匯入到專案中。
步驟 2:建立 script 腳本與 atlas 地圖集
在遊戲物件上加入兩個核心元件:
script腳本:負責角色的邏輯與行為控制,例如移動、過關判定、攻擊邏輯等程式碼都寫在這裡。atlas地圖集:負責角色的視覺與動畫顯示,例如外型貼圖、動畫幀序列等都存放在這裡。
💡 簡單理解:
script是大腦(控制怎麼動),atlas是外表(控制長什麼樣)。
步驟 3:在 atlas 中加入圖片物件
打開 atlas 地圖集,將剛才匯入的角色圖片添加為圖片物件(Image Object)。這樣 Defold 才能正確渲染角色的外觀。
補充說明
| 元件 | 用途 | 常見內容 |
|---|---|---|
script |
控制邏輯 | 移動輸入、碰撞檢測、攻擊判定、狀態切換 |
atlas |
視覺資源 | 靜態貼圖、動畫幀、九宮格切片 |
完成以上步驟後,你的主角就具備了基本的結構,接下來就可以在 script 中編寫控制程式碼,讓角色動起來!
鍵盤輸入測試
建立鍵盤輸入對應
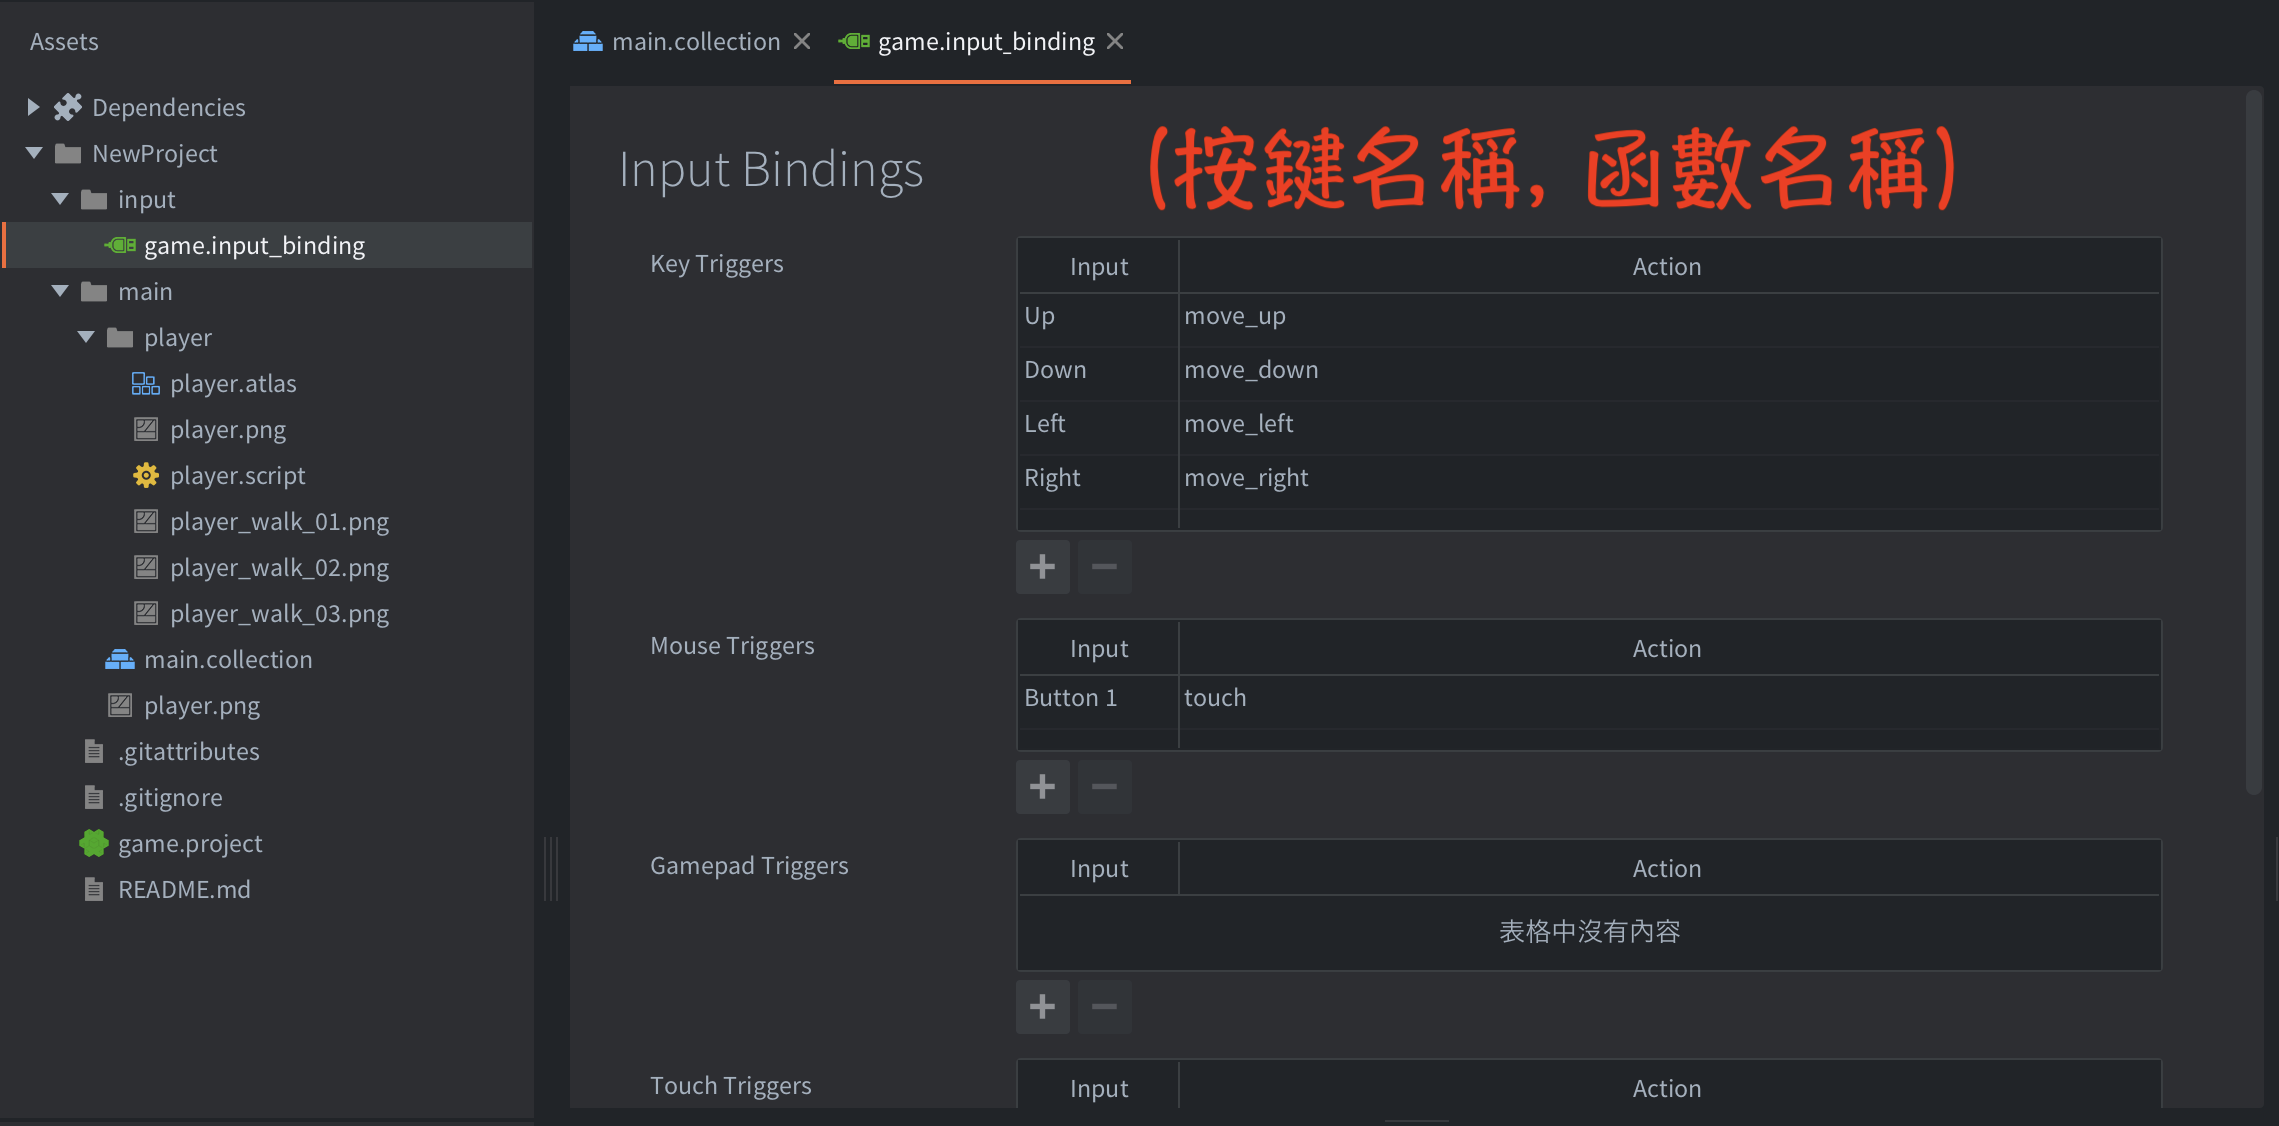
在 Defold 中,鍵盤按鍵不會直接對應到 Lua 函式名稱,而是要先在 input/game.input_binding 中建立「按鍵」與「Action 名稱」的對應關係。
之後,程式便可以透過這些 Action 名稱判斷使用者按下了哪一個按鍵。
設定方向鍵
打開專案中的:
input/game.input_binding
在 Key Triggers 區域加入以下設定:
| 鍵盤按鍵 | Action 名稱 |
|---|---|
| Up | move_up |
| Down | move_down |
| Left | move_left |
| Right | move_right |
例如:
Up → move_up
這裡的 move_up 不是函式名稱,而是輸入事件的識別名稱。之後在 player.script 的 on_input() 中,就可以使用以下程式碼判斷上方向鍵:
if action_id == hash("move_up") then
    -- 執行向上移動
end
注意事項
- Action 名稱可以自行命名,但必須與腳本中的名稱完全一致。
move_up、Move_Up和move-up會被視為不同名稱,建議統一使用小寫英文與底線。- 每個方向鍵都要建立自己的 Action,程式才能分辨目前收到的是哪一個輸入。
- 修改
game.input_binding後,請儲存檔案並重新執行遊戲進行測試。
完成設定後,Defold 收到方向鍵輸入時,就會將對應的 Action 名稱傳給取得 input focus 的 Game Object,接著由該物件的 on_input() 函式處理輸入。
--player.script--
function init(self)
	msg.post(".", "acquire_input_focus")

	self.move_speed = 200
	self.direction = vmath.vector3(0, 0, 0)
end

function update(self, dt)
	local position = go.get_position()

	position = position + self.direction * self.move_speed * dt

	go.set_position(position)
end

function on_input(self, action_id, action)
	if action_id == hash("move_up") then
		self.direction.y = action.pressed and 1 or 0

	elseif action_id == hash("move_down") then
		self.direction.y = action.pressed and -1 or 0

	elseif action_id == hash("move_left") then
		self.direction.x = action.pressed and -1 or 0

	elseif action_id == hash("move_right") then
		self.direction.x = action.pressed and 1 or 0
	end

	return true
end
加上背景頁
在 Defold 中,加入背景的流程和加入主角非常相似:先準備圖片素材,再建立 Atlas,最後將 Sprite 放到 Collection 中顯示。
建立背景素材
首先將背景圖片匯入專案,接著建立背景專用的 Atlas,並將圖片加入 Atlas 中。
接著在 main.collection 建立一個新的 Game Object,命名為 background,並加入 Sprite 元件,指定剛才建立的 Atlas 與圖片動畫。
設定背景位置與圖層
將背景放到遊戲畫面的適當位置,並調整圖片大小,使它能覆蓋整個遊戲畫面。
由於背景應該位於所有遊戲物件的最底層,請將它的 Z 座標設定為:
Z = -0.1
在 Defold 的 2D 場景中,Z 座標會影響重疊物件的前後順序;Z 值較大的物件會顯示在 Z 值較小的物件前方。因此,將背景設為 -0.1,主角與其他物件設為 0 或更大的值,就能讓背景顯示在最底層。
建議設定
| 項目 | 設定 |
|---|---|
| Game Object Id | background |
| Component | Sprite |
| Position | 依照遊戲畫面調整 |
| Z | -0.1 |
| Sprite | 背景圖片對應的 Atlas 動畫 |
💡 如果背景和其他 Sprite 使用完全相同的 Z 值,顯示順序可能不固定。為了避免畫面閃爍或前後順序不一致,建議為不同圖層使用不同的 Z 值。
完成後,背景就會固定在主角與其他遊戲物件的後方,成為遊戲畫面的底圖。
加上背景音樂
在 Defold 中加入背景音樂的流程,和建立主角或背景物件類似:先建立一個 Game Object,再替它加入對應的元件與腳本。
這次需要使用的元件是 Sound。Sound 元件會載入並播放指定的音效或音樂檔案;加入腳本後,便可以在遊戲開始時呼叫 sound.play() 播放音樂。
匯入音樂檔案
首先將 .ogg 音樂檔案匯入專案,例如:
assets/audio/bgm.ogg
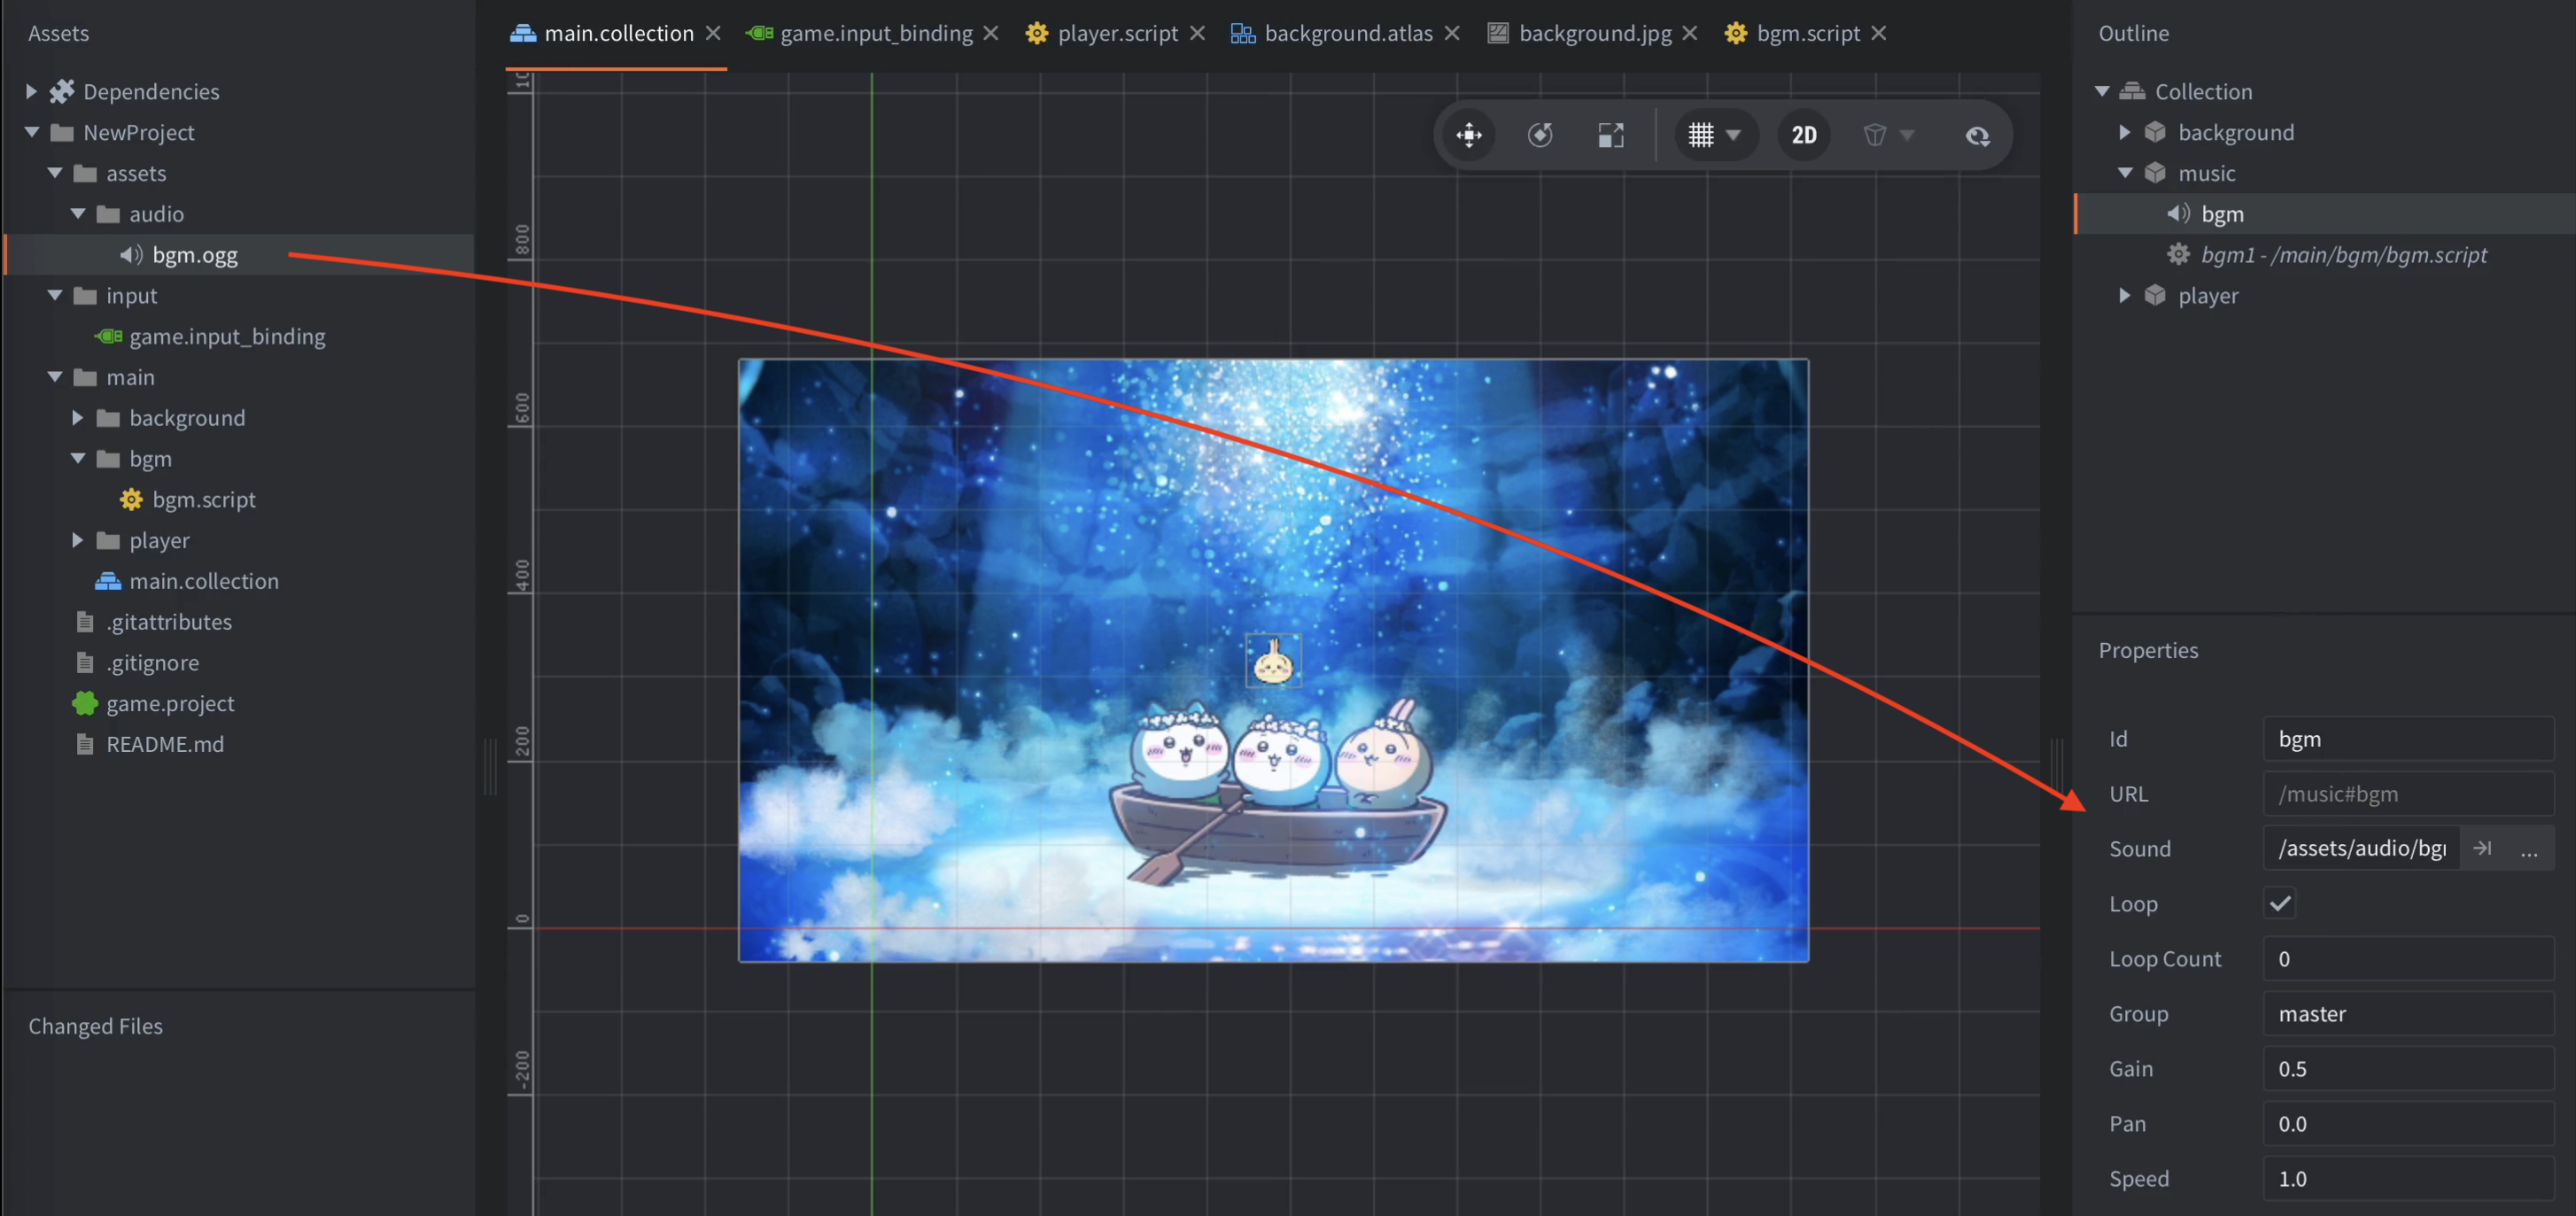
接著在 main.collection 建立一個新的 Game Object,命名為 music 或 bgm。
加入 Sound 元件
選取剛建立的 Game Object,加入 Sound 元件,並設定以下內容:
| 設定 | 建議值 | 說明 |
|---|---|---|
| Id | bgm |
程式中會透過 #bgm 取得這個元件。 |
| Sound | assets/audio/bgm.ogg |
指定要播放的音樂檔案。 |
| Loop | 開啟 | 音樂播放完後自動重新開始。 |
| Loop Count | 0 |
持續循環播放,直到手動停止。 |
| Group | master |
使用預設的主音量群組。 |
| Gain | 0.5 或 1.0 |
設定這個 Sound 元件的音量。 |
在 Defold 中,Loop Count 設為 0 代表持續循環播放,直到呼叫 sound.stop() 停止音樂。
加入播放腳本
在 bgm Game Object 上加入一個 Script,命名為 bgm.script,並加入以下程式碼:
function init(self)
    sound.play("#bgm", {
        gain = 1.0,
        pan = 0.0
    })
end
#bgm 代表目前 Game Object 底下 Id 為 bgm 的 Sound 元件。當遊戲載入這個 Game Object 時,init() 會被呼叫,音樂也會開始播放。
完整範例
--bgm.script--
function init(self)
    sound.play("#bgm", {
        gain = 1.0,
        pan = 0.0,
        speed = 1.0
    })
end
其中:
gain:播放時的音量,1.0為原始音量。pan:左右聲道位置,0.0代表置中。speed:播放速度,1.0代表正常速度。
停止背景音樂
如果要在切換場景或離開遊戲時停止音樂,可以呼叫:
function final(self)
    sound.stop("#bgm")
end
不過要注意,Defold 的 Sound 播放後,即使所屬的 Game Object 被刪除,音樂仍可能繼續播放;需要明確呼叫 sound.stop() 才能停止。
常見問題
如果沒有聽到音樂,請依序確認:
.ogg檔案已成功匯入專案。- Sound 元件的 Sound 欄位已指定正確的音樂檔案。
- Sound 元件的 Id 確實是
bgm。 - 程式中的路徑是
#bgm,而不是音樂檔案路徑。 - Sound 元件的 Loop 已開啟。
- 專案的全域音量沒有被設為 0。
bgm.script確實已加入同一個 Game Object。
完成後,遊戲啟動時就會自動播放背景音樂,並在播放結束後持續循環。
使用鍵盤移動主角
經過前面的測試,我們已經確認鍵盤輸入可以正常傳送到遊戲中。接下來將移動程式整理得更完整,讓主角可以:
- 按住方向鍵持續移動。
- 同時按住兩個方向鍵進行斜向移動。
- 放開按鍵後立即停止對應方向的移動。
- 斜向移動時維持與單一方向相同的速度。
Defold 會將輸入 Action 傳給已取得 input focus、且實作 on_input() 的腳本元件;action.pressed 和 action.released 可用來判斷按鍵狀態。
使用按鍵狀態
不要在按下按鍵時只移動一次,而是將每個按鍵目前是否被按住記錄在 self 中。接著在 update() 裡持續讀取這些狀態,便能實現「按住就持續移動」。
--player.script--
local MOVE_SPEED = 200

function init(self)
    -- 取得鍵盤輸入焦點
    msg.post(".", "acquire_input_focus")

    self.up_pressed = false
    self.down_pressed = false
    self.left_pressed = false
    self.right_pressed = false
end

function update(self, dt)
    local direction = vmath.vector3(0, 0, 0)

    if self.up_pressed then
        direction.y = direction.y + 1
    end

    if self.down_pressed then
        direction.y = direction.y - 1
    end

    if self.left_pressed then
        direction.x = direction.x - 1
    end

    if self.right_pressed then
        direction.x = direction.x + 1
    end

    -- 避免斜向移動比單一方向更快
    if vmath.length(direction) > 0 then
        direction = vmath.normalize(direction)
    end

    local position = go.get_position()
    position = position + direction * MOVE_SPEED * dt
    go.set_position(position)
end

function on_input(self, action_id, action)
    local is_pressed = action.pressed

    if action_id == hash("move_up") then
        self.up_pressed = is_pressed

    elseif action_id == hash("move_down") then
        self.down_pressed = is_pressed

    elseif action_id == hash("move_left") then
        self.left_pressed = is_pressed

    elseif action_id == hash("move_right") then
        self.right_pressed = is_pressed
    end

    -- 表示這個腳本已處理輸入
    return true
end
程式運作方式
1. 記錄按鍵狀態
例如按下 Up 時:
self.up_pressed = true
放開 Up 時:
self.up_pressed = false
因此,update() 每一幀都能知道目前哪些按鍵仍然被按住。
2. 計算移動方向
上下方向會影響 direction.y,左右方向會影響 direction.x。例如同時按住 Up 和 Right 時,方向向量會是:
vmath.vector3(1, 1, 0)
3. 修正斜向速度
如果直接使用 vector3(1, 1, 0),它的長度會大於 1,因此斜向移動會比單一方向快。透過 vmath.normalize() 將方向向量標準化後,就能維持固定速度。
4. 使用 dt 移動
最後將方向、移動速度與每幀經過的時間相乘:
direction * MOVE_SPEED * dt
這樣移動速度會以「每秒」計算,而不是取決於每秒更新幾幀。
測試方式
執行遊戲後,可以依序測試:
- 按住 Up,確認主角持續向上移動。
- 按住 Left 或 Right,確認主角持續左右移動。
- 同時按住 Up + Right,確認主角能斜向移動。
- 放開其中一個按鍵,確認主角只保留另一個方向的移動。
- 同時按住 Left + Right,確認兩個方向會互相抵消。
如果按鍵完全沒有反應,請確認 game.input_binding 中的 Action 名稱,是否與腳本中的 move_up、move_down、move_left 和 move_right 完全一致。
改用滑鼠移動
前面的版本是透過鍵盤方向鍵控制主角。這一節改用滑鼠操作:按下滑鼠左鍵後,主角會朝著滑鼠游標的位置移動。
要完成這個功能,需要先在 game.input_binding 加入 Mouse Trigger,再修改 player.script,讓程式接收滑鼠座標並計算移動方向。
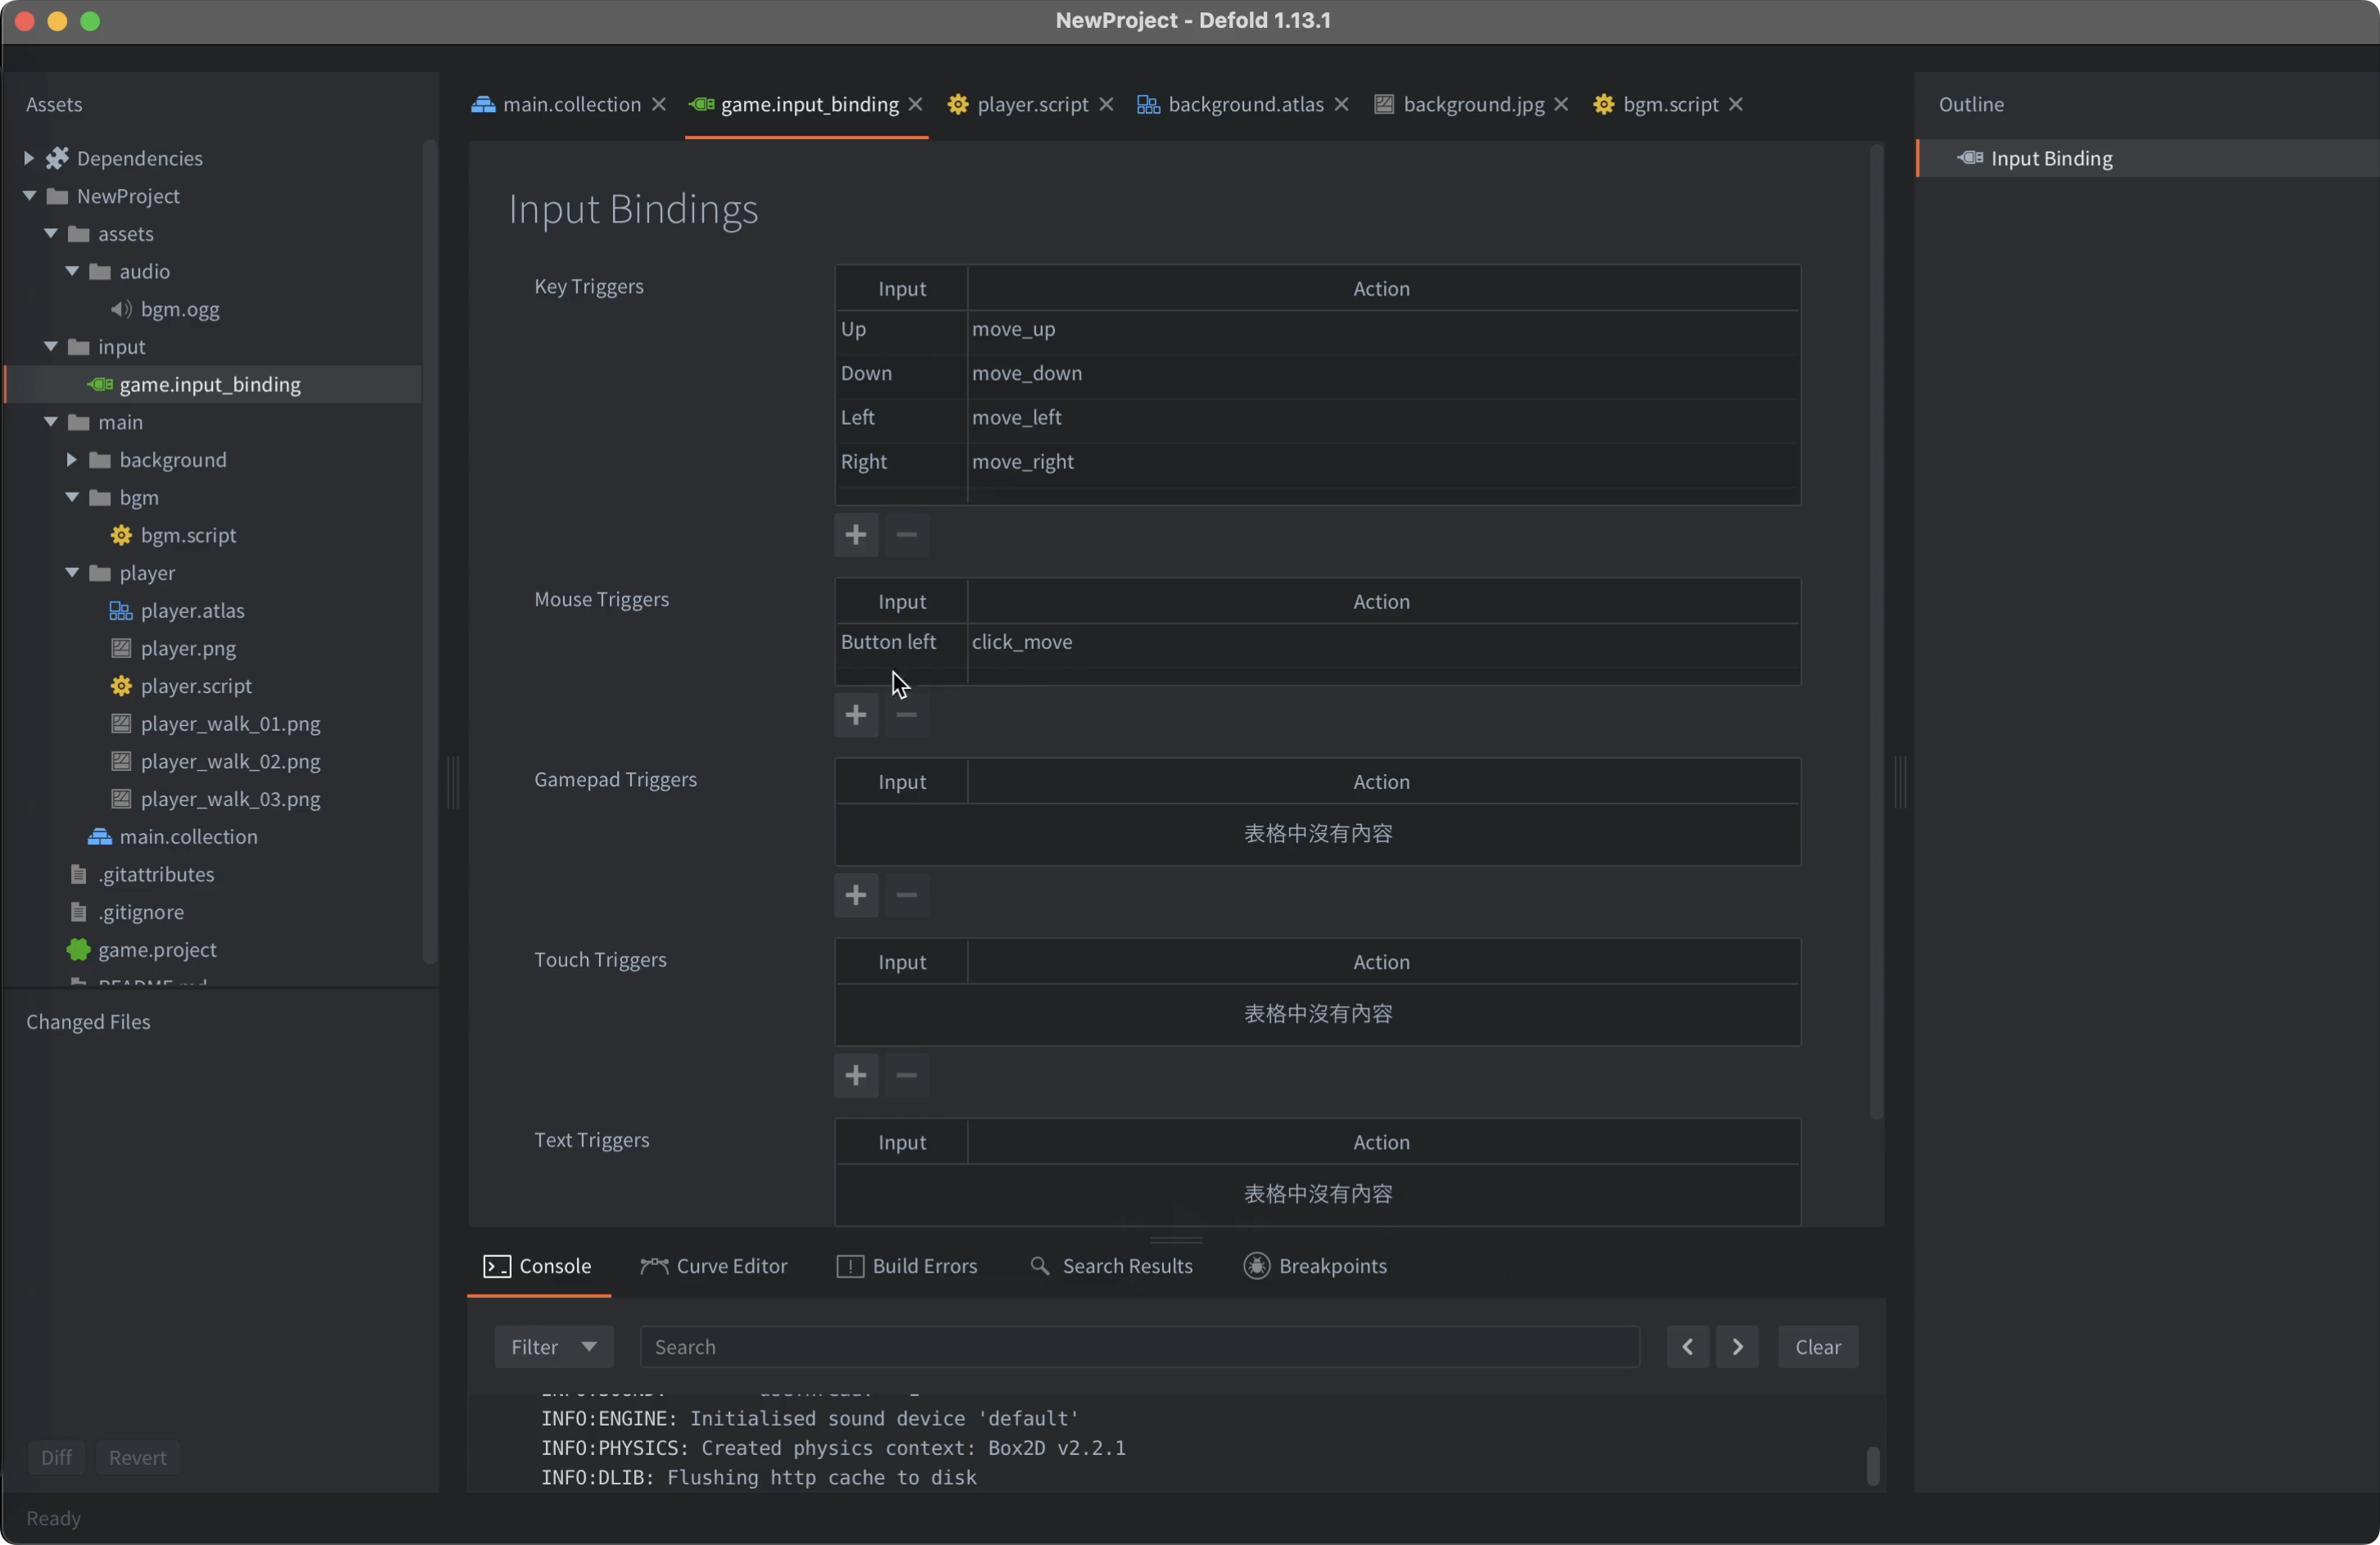
設定 Mouse Trigger
打開:
input/game.input_binding
在 Mouse Triggers 區域新增一筆設定:
| Input | Action |
|---|---|
| Button left | click_move |
click_move 是自訂的 Action 名稱,之後程式會透過 hash("click_move") 判斷滑鼠左鍵事件。滑鼠輸入同樣會以 Action 的形式傳送給已取得 input focus 的腳本。
修改主角腳本
將 player.script 改成以下版本:
--player.script--
local MOVE_SPEED = 200

function init(self)
    msg.post(".", "acquire_input_focus")

    self.target_position = go.get_position()
end

function update(self, dt)
    local position = go.get_position()
    local offset = self.target_position - position
    local distance = vmath.length(offset)

    if distance > 1 then
        local direction = vmath.normalize(offset)
        local movement = MOVE_SPEED * dt

        -- 避免接近目的地時超過目標位置
        if movement >= distance then
            position = self.target_position
        else
            position = position + direction * movement
        end

        go.set_position(position)
    end
end

function on_input(self, action_id, action)
    if action_id == hash("click_move") and action.pressed then
        self.target_position = vmath.vector3(action.x, action.y, 0)
    end

    return true
end
程式運作方式
取得滑鼠座標
滑鼠左鍵按下時,action.x 和 action.y 會提供滑鼠在遊戲視窗中的座標。程式將它們組合成目標位置:
self.target_position = vmath.vector3(action.x, action.y, 0)
朝目標位置移動
update() 每一幀都會計算主角目前位置與目標位置的差距:
local offset = self.target_position - position
接著使用 vmath.normalize() 將差距轉換成單位方向向量,再乘上速度與 dt,讓主角以固定速度移動。
避免超過目標
如果主角距離目標很近,而下一次移動距離超過剩餘距離,程式會直接將主角放到目標位置:
if movement >= distance then
    position = self.target_position
end
這樣可以避免主角在目標附近來回穿越。
測試方式
- 執行遊戲。
- 在遊戲視窗中按下滑鼠左鍵。
- 確認主角會朝游標位置移動。
- 在不同位置重複點擊,確認主角會改變移動目標。
注意事項
click_move必須與game.input_binding中的 Action 名稱完全一致。player.script必須掛在能接收輸入的主角 Game Object 上。- 如果使用的是高 DPI 或自訂 Camera,滑鼠座標可能需要額外轉換為世界座標;本範例先假設遊戲畫面座標與場景座標一致。
- 如果仍想保留鍵盤控制,可以在同一個
on_input()中同時處理move_up、move_down、move_left與move_right。
主角動畫
接下來替主角加入兩種動畫:
idle:主角沒有移動時播放的待機動畫。walk:主角移動時播放的行走動畫。
Defold 的 Sprite 可以使用 Atlas 中建立的多張圖片播放 Flipbook 動畫,並透過 sprite.play_flipbook() 在遊戲執行期間切換動畫。
在 Atlas 建立動畫
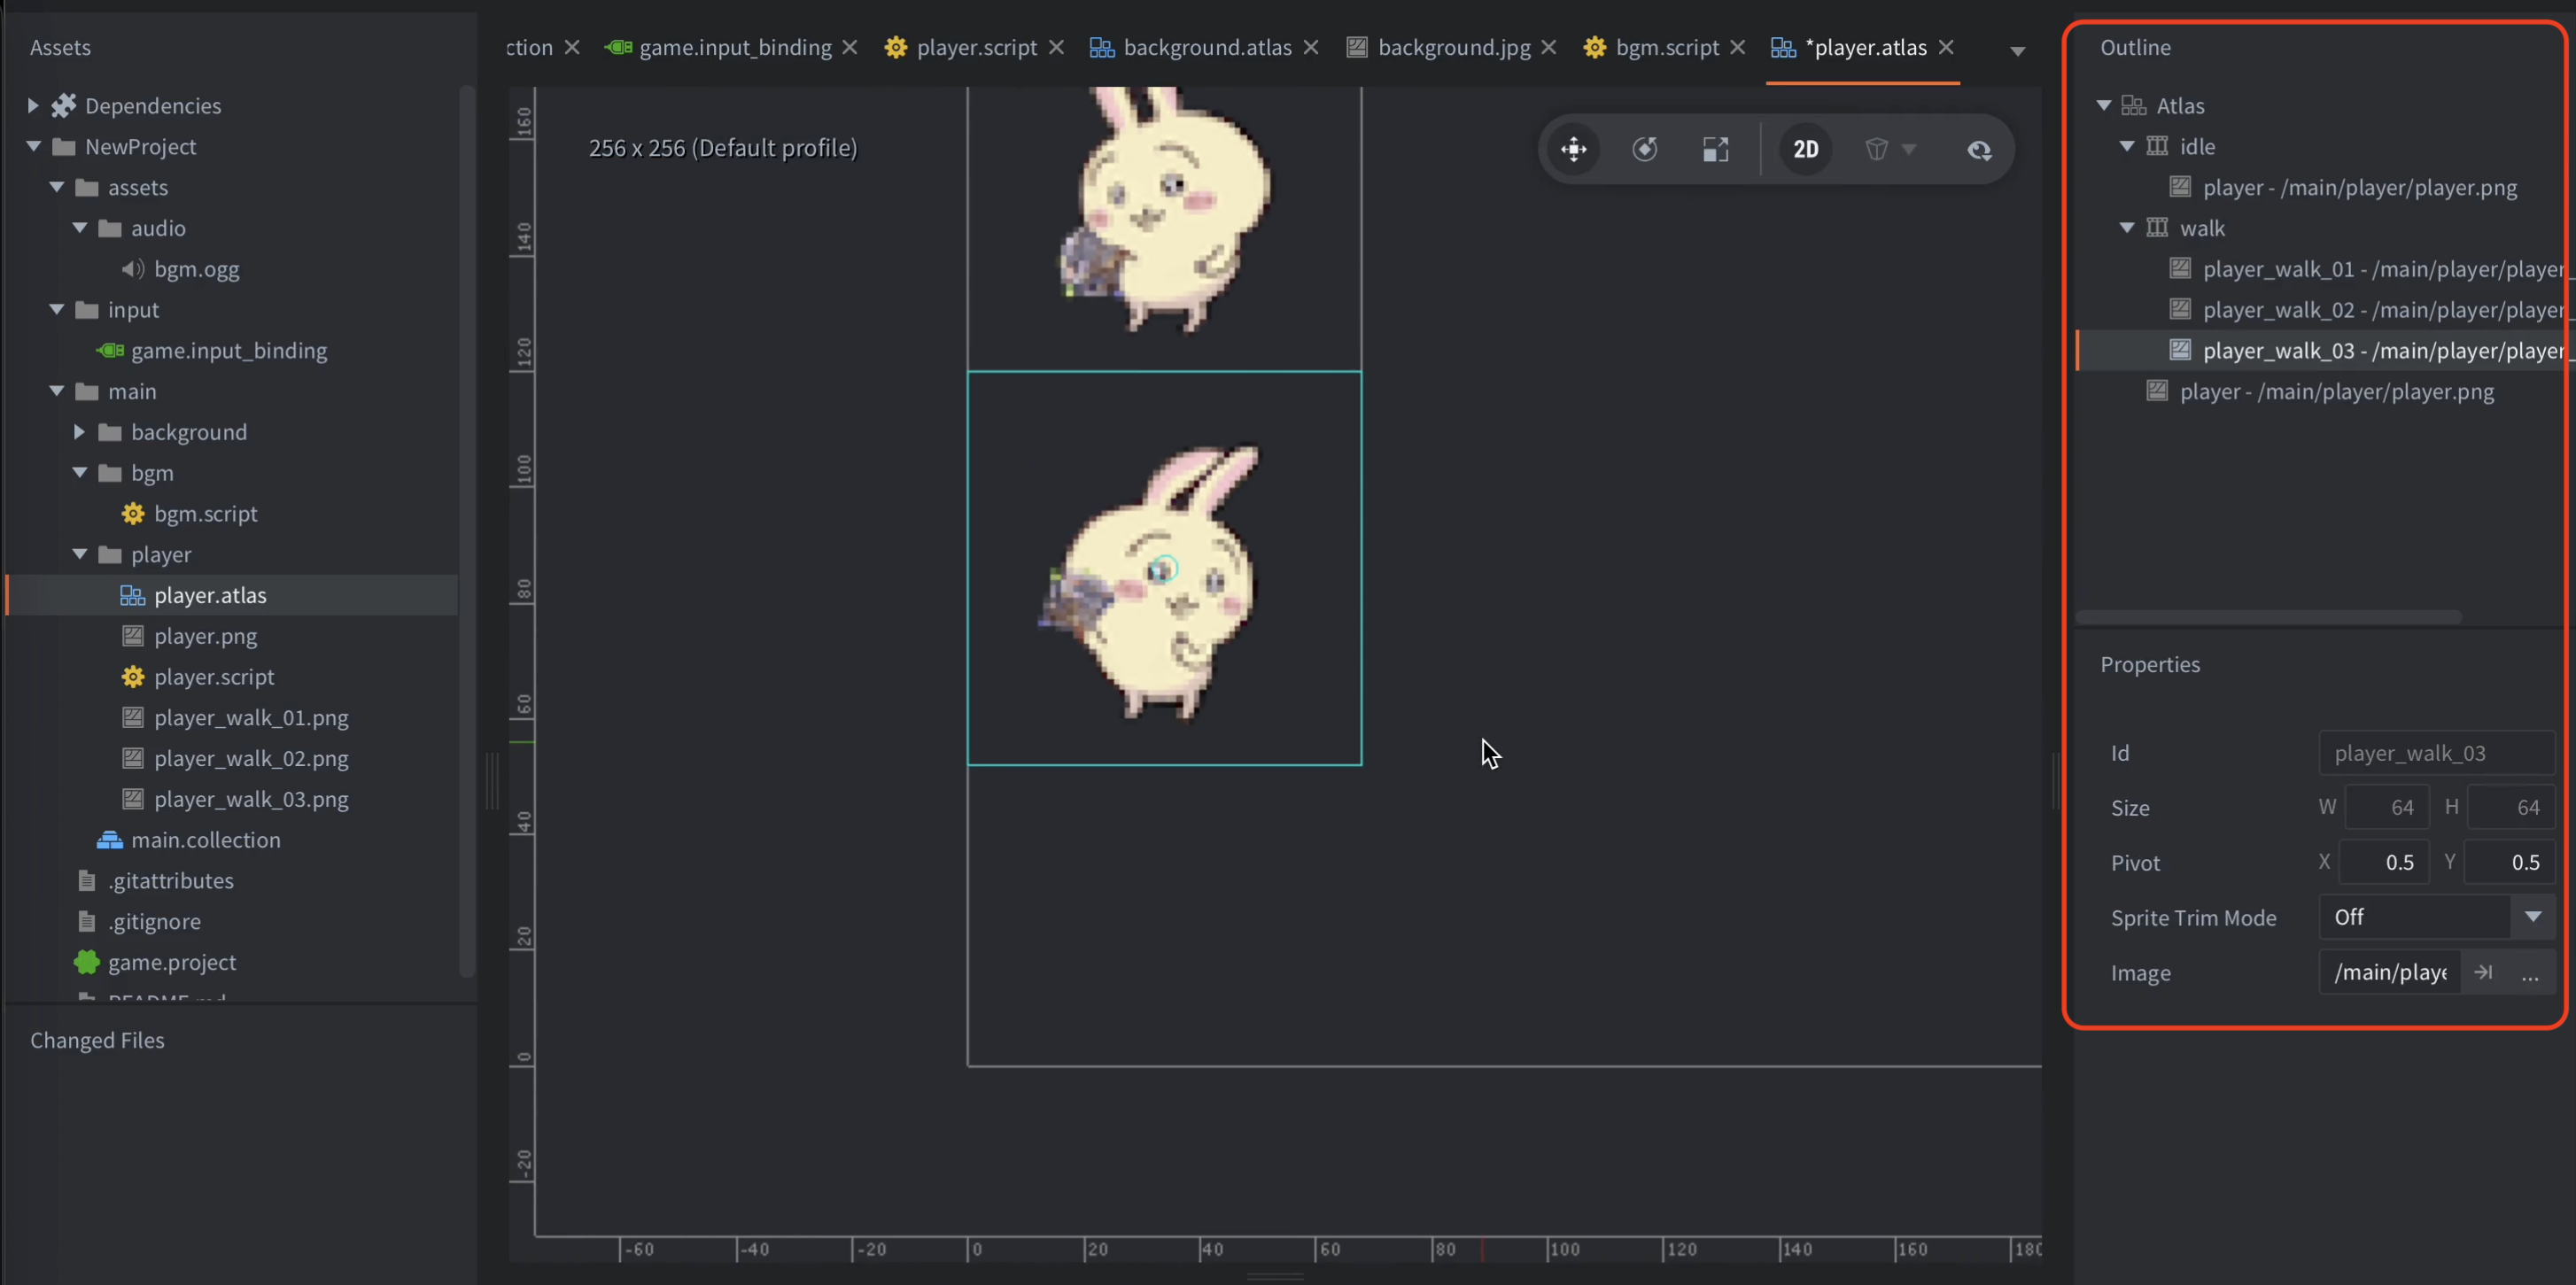
打開 player.atlas,在 Atlas 中建立兩個 Animation:
idle
將主角沒有移動時使用的圖片加入 idle 動畫。即使只有一張圖片,也可以作為靜態待機畫面。
walk
將行走動畫的影格依照播放順序加入 walk:
player_walk_01
player_walk_02
player_walk_03
Defold 會依照圖片順序播放這些影格。請確認每張圖片的尺寸與 Pivot 設定一致,避免播放時主角的位置出現跳動。
設定 Sprite
在 main.collection 中選取主角的 Sprite 元件,確認 Atlas 指定為:
/main/player/player.atlas
接著將 Default Animation 設定為:
idle
這樣遊戲開始時,主角會先顯示待機動畫。
使用程式控制動畫
在 player.script 中,使用 sprite.play_flipbook() 播放指定動畫:
sprite.play_flipbook("#sprite", "walk")
其中:
#sprite:目前 Game Object 中 Id 為sprite的 Sprite 元件。"walk":Atlas 中的動畫名稱。
根據移動狀態切換
可以在移動腳本中加入一個函式,依照主角目前是否移動來切換 idle 與 walk:
local MOVE_SPEED = 200

function init(self)
    msg.post(".", "acquire_input_focus")

    self.up_pressed = false
    self.down_pressed = false
    self.left_pressed = false
    self.right_pressed = false
    self.current_animation = nil
end

local function play_animation(self, animation)
    if self.current_animation ~= animation then
        self.current_animation = animation
        sprite.play_flipbook("#sprite", animation)
    end
end

function update(self, dt)
    local direction = vmath.vector3(0, 0, 0)

    if self.up_pressed then
        direction.y = direction.y + 1
    end

    if self.down_pressed then
        direction.y = direction.y - 1
    end

    if self.left_pressed then
        direction.x = direction.x - 1
    end

    if self.right_pressed then
        direction.x = direction.x + 1
    end

    if vmath.length(direction) > 0 then
        direction = vmath.normalize(direction)
        play_animation(self, "walk")
    else
        play_animation(self, "idle")
    end

    local position = go.get_position()
    position = position + direction * MOVE_SPEED * dt
    go.set_position(position)
end

function on_input(self, action_id, action)
    local is_pressed = action.pressed

    if action_id == hash("move_up") then
        self.up_pressed = is_pressed

    elseif action_id == hash("move_down") then
        self.down_pressed = is_pressed

    elseif action_id == hash("move_left") then
        self.left_pressed = is_pressed

    elseif action_id == hash("move_right") then
        self.right_pressed = is_pressed
    end

    return true
end
控制動畫播放速度
Atlas 動畫的播放速度由動畫設定中的 FPS 決定。FPS 越高,影格切換越快;FPS 越低,動畫播放越慢。
也可以在程式中傳入播放參數,控制動畫播放速度或是否循環:
sprite.play_flipbook("#sprite", "walk", function(self, url, property)
    print("動畫播放完成")
end, 1.0, 0, 1)
一般行走動畫應該設定為循環播放;如果是一次性的攻擊或受傷動畫,則可以設定為不循環,並在完成回呼中切回 idle。
為什麼要避免重複播放
如果每一幀都呼叫:
sprite.play_flipbook("#sprite", "walk")
就可能不斷重新啟動動畫,導致動畫一直停留在第一影格。因此範例使用 self.current_animation 記錄目前動畫,只有在動畫名稱改變時才重新播放。
完成後,主角停止時會播放 idle,開始移動時會切換到 walk,並依照 Atlas 設定的 FPS 持續播放行走影格。
主角移動時的音效
前面已經學會如何替 Game Object 加入 Sound 元件。背景音樂是在遊戲開始時由 bgm.script 播放;這一次則將音效放在主角 player 上,並由 player.script 控制播放時機。
主角開始移動時播放行走音效,抵達目標並停止移動時停止音效。這樣可以避免主角停止後,行走聲仍然持續播放。
加入行走音效
首先將行走音效匯入專案,例如:
assets/audio/walk.ogg
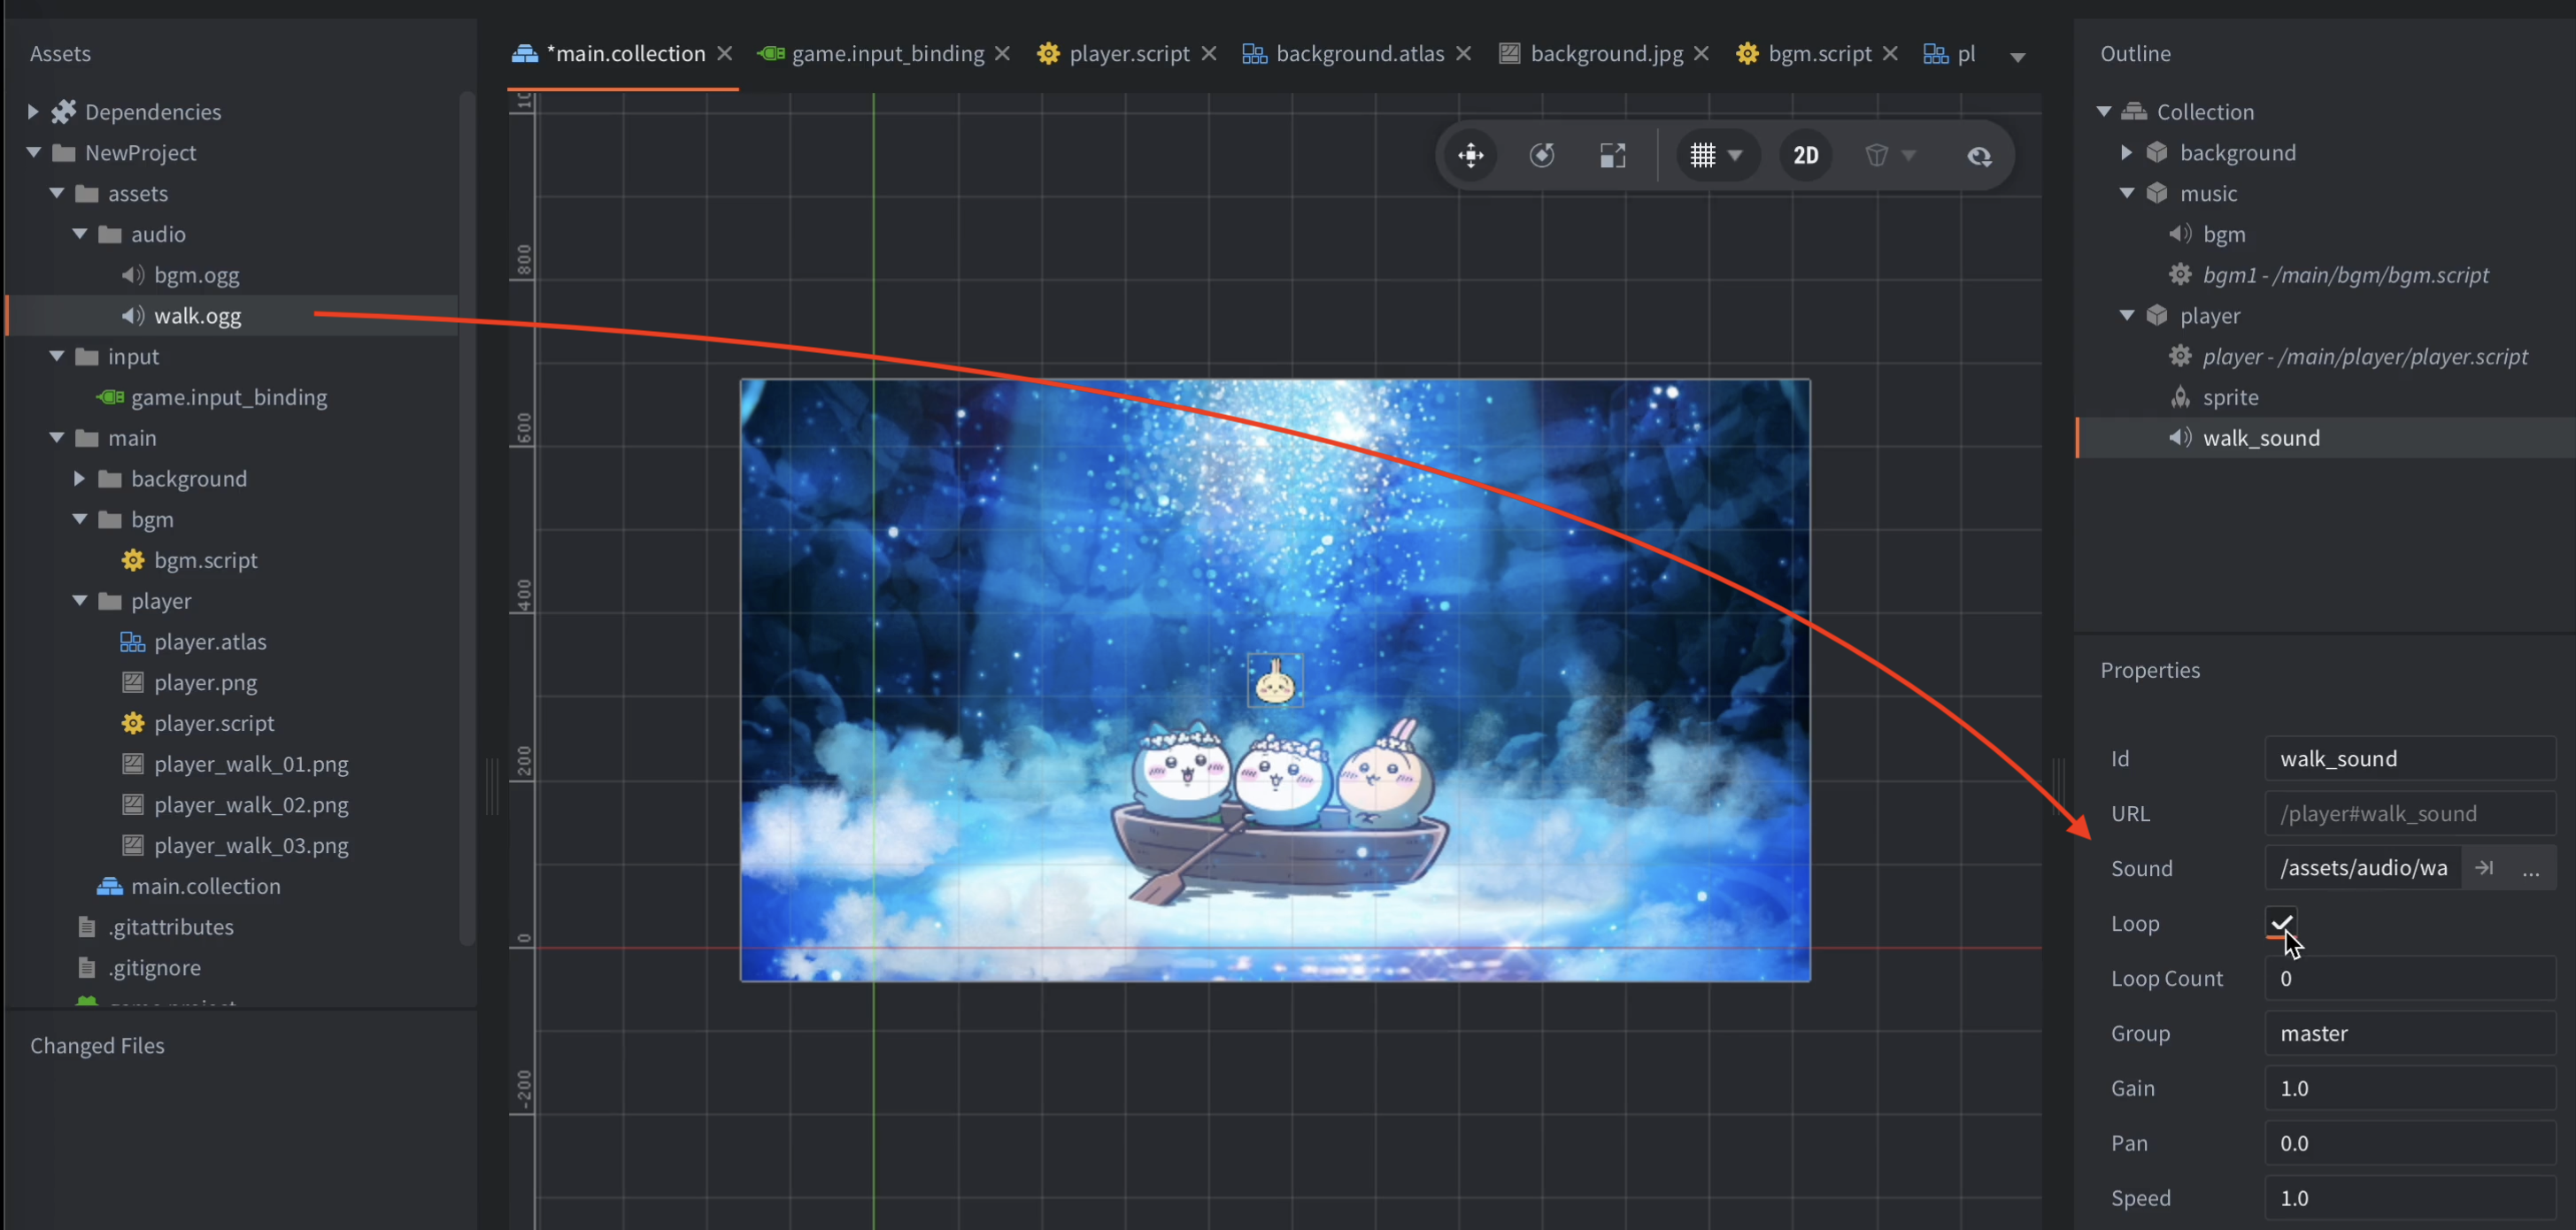
接著在 main.collection 中選取 player Game Object,加入一個 Sound 元件,並設定:
| 設定 | 值 |
|---|---|
| Id | walk_sound |
| Sound | assets/audio/walk.ogg |
| Loop | 開啟 |
| Loop Count | 0 |
| Group | master |
| Gain | 依需求調整,例如 1.0 |
因為音效由主角的腳本控制,所以 Sound 元件應該放在 player Game Object 底下。程式便可以使用 #walk_sound 找到它。
播放與停止音效
在 player.script 中建立兩個小函式:
local function play_walk_sound(self)
    if not self.walk_sound_playing then
        sound.play("#walk_sound", {
            gain = 1.0,
            pan = 0.0
        })

        self.walk_sound_playing = true
    end
end

local function stop_walk_sound(self)
    if self.walk_sound_playing then
        sound.stop("#walk_sound")
        self.walk_sound_playing = false
    end
end
self.walk_sound_playing 用來記錄目前是否已經播放行走音效,避免 update() 每一幀都重新呼叫 sound.play(),導致音效不斷從頭開始播放。
整合到移動程式
在 init() 中先初始化狀態:
function init(self)
    msg.post(".", "acquire_input_focus")

    self.move_speed = 200
    self.is_moving = false
    self.target_position = go.get_position()
    self.walk_sound_playing = false
end
在 update() 中,主角開始移動時播放音效,抵達目標時停止音效:
function update(self, dt)
    if not self.is_moving then
        stop_walk_sound(self)
        return
    end

    local current_position = go.get_position()
    local to_target = self.target_position - current_position
    local distance = vmath.length(to_target)
    local step = self.move_speed * dt

    if distance <= step then
        go.set_position(self.target_position)
        self.is_moving = false
        stop_walk_sound(self)
        return
    end

    play_walk_sound(self)

    local direction = vmath.normalize(to_target)
    local new_position = current_position + direction * step
    go.set_position(new_position)
end
整合滑鼠輸入
在滑鼠左鍵按下時,設定新的目標位置並開始移動:
function on_input(self, action_id, action)
    if action_id == hash("click_move") and action.pressed then
        self.target_position = vmath.vector3(action.x, action.y, 0)
        self.is_moving = true
    end

    return true
end
與動畫一起使用
如果主角同時使用 idle 和 walk 動畫,可以在相同的位置控制動畫與音效:
if distance <= step then
    go.set_position(self.target_position)
    self.is_moving = false
    stop_walk_sound(self)
    play_animation(self, IDLE)
    return
end

play_walk_sound(self)
play_animation(self, WALK)
這樣主角移動時會同時播放 walk 動畫與行走音效;抵達目標後,則切回 idle 動畫並停止行走音效。
注意事項
- Sound 元件的 Id 必須是
walk_sound,程式中的#walk_sound才能找到它。 walk.ogg的 Loop 必須開啟,否則音效播放一次後就會結束。- 不要在
update()中無條件呼叫sound.play();應使用狀態變數避免重複播放。 - 行走音效通常適合使用較短的循環素材。
- 如果音效太大聲,可以降低 Sound 元件的 Gain,或將
sound.play()的gain設為較小的值。
建立碰撞物品
為了讓主角可以吃掉物品,我們需要替主角和可收集物品各自加入 Collision Object,並設定正確的碰撞群組與遮罩。
建立 Collectible Game Object
首先建立一個新的 Game Object,命名為 collectible,並加入以下元件:
- Sprite:顯示物品圖片。
- Collision Object:偵測主角是否碰到物品。
- Collision Shape:提供碰撞範圍。
- Script:處理物品被吃掉時的邏輯。
--collectible.script--
local GROW_AMOUNT = 1.0

function on_message(self, message_id, message, sender)
	if message_id == hash("trigger_response")
	and message.enter
	and message.other_group == hash("player") then

		local player_url = "/player"
		local scale = go.get_scale(player_url)

		scale.x = scale.x + GROW_AMOUNT
		scale.y = scale.y + GROW_AMOUNT

		go.set_scale(scale, player_url)
		go.delete()
	end
end
接著在 Collision Object 中建立一個 Box Collision Shape,並調整它的大小,使碰撞框大致覆蓋整個物品。碰撞框不需要完全符合圖片外形,但不應該大到讓主角還沒碰到物品就觸發事件。
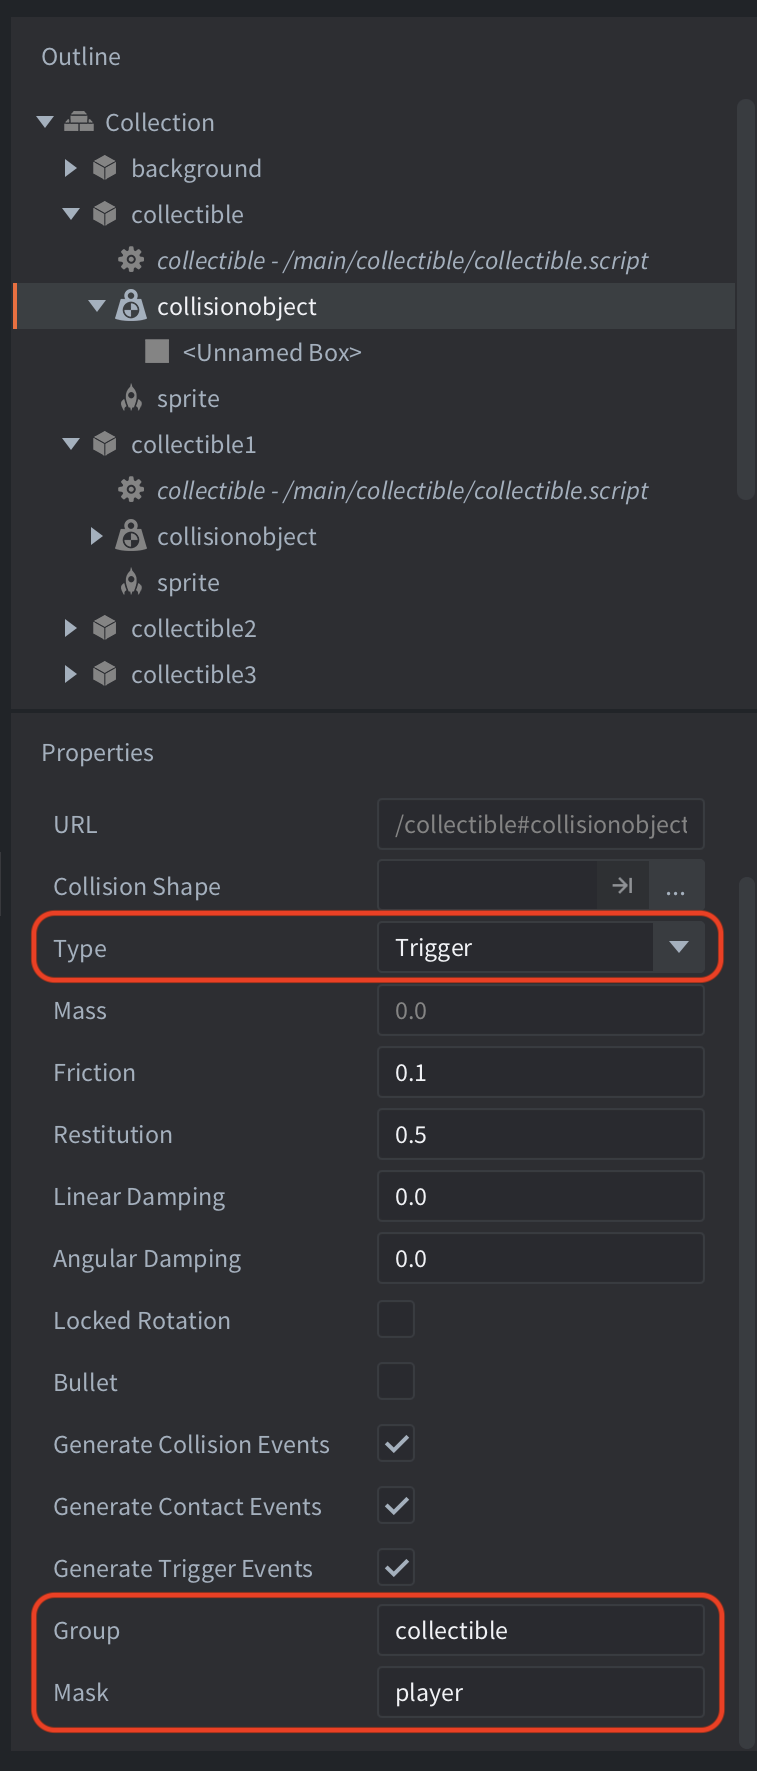
設定 Collectible 碰撞參數
選取 Collectible 的 Collision Object,設定以下內容:
| 設定 | 值 | 說明 |
|---|---|---|
| Type | Trigger |
只偵測進入與離開,不會阻擋主角。 |
| Group | collectible |
將物品分類為可收集物件。 |
| Mask | player |
只偵測 collision group 為 player 的物件。 |
| Generate Trigger Events | 開啟 | 產生 Trigger 事件,讓腳本收到 trigger_response 訊息。 |
其他事件選項通常可以先維持預設值;本教學主要使用 Trigger Event。
設定 Player 碰撞參數
選取主角 player 的 Collision Object,同樣建立一個 Box Collision Shape,並將碰撞框調整到適合主角的大小。
建議設定如下:
| 設定 | 值 | 說明 |
|---|---|---|
| Type | Kinematic |
適合由腳本控制移動的主角。 |
| Group | player |
將主角分類為玩家物件。 |
| Mask | collectible |
允許主角偵測可收集物品。 |
| Generate Trigger Events | 開啟 | 產生 Trigger 事件。 |
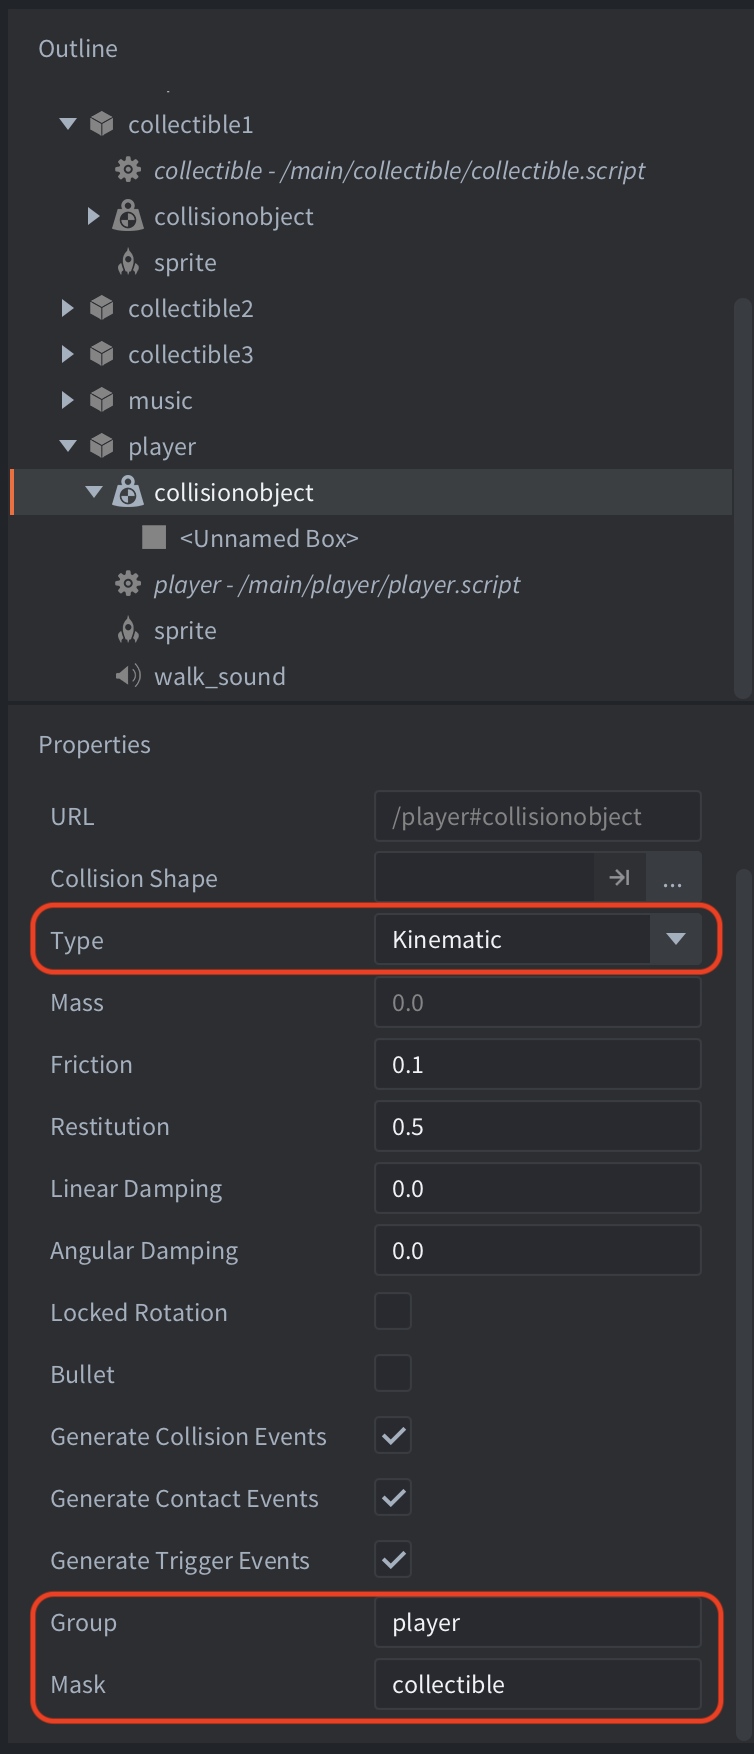
Group 與 Mask 的對應關係
Group 可以理解為「我是誰」,Mask 則可以理解為「我想偵測誰」。
本範例的設定如下:
| 物件 | Type | Group | Mask |
|---|---|---|---|
| Collectible | Trigger |
collectible |
player |
| Player | Kinematic |
player |
collectible |
兩個物件的設定必須互相對應:
- Collectible 的 Mask 是
player,因此它可以偵測主角。 - Player 的 Mask 是
collectible,因此它可以偵測物品。 - 兩邊都必須開啟 Generate Trigger Events,腳本才會收到 Trigger 訊息。
碰撞群組與遮罩會決定物理系統要讓哪些物件互相產生碰撞或觸發事件。
複製多個物品
完成設定並測試確認功能正常後,就可以直接複製 collectible Game Object。複製後,每一個物品都會保留相同的 Sprite、Collision Object、Collision Shape 與 Script,只需要調整它們在 Collection 中的位置即可。
建議將複製出的物品重新命名,例如:
collectible_01
collectible_02
collectible_03
collectible_04
collectible_05
collectible_06
這樣主角碰到任一個物品時,都會觸發相同的收集邏輯;被吃掉的物品會刪除自己,其他物品則不受影響。
Github下載
總結
這篇教學以一個簡單的 2D 遊戲為例,完成了 Defold 入門時最重要的基礎功能。
學習過程中,AI 在理解 Lua 語法、整理程式邏輯,以及排查碰撞與輸入問題時提供了不少幫助;而 Lua 本身語法簡潔,對初學者來說也相對容易上手。
目前我們已經完成:
- 建立 Defold 專案與認識 IDE 介面
- 匯入圖片、建立 Atlas 與 Sprite
- 建立主角、背景與可收集物品
- 使用鍵盤與滑鼠控制主角移動
- 建立
idle與walk主角動畫 - 使用 Collision Object、Group 與 Mask 偵測碰撞
- 吃到物品後刪除物品,並讓主角變大
- 加入背景音樂與主角移動音效
這些功能已經足以做出不少簡單的 2D 遊戲原型,例如倉庫番、問答遊戲、收集遊戲,或是有基本關卡互動的小遊戲。
下一步不再只是測試單一功能,而是把這些功能整合成一個真正能玩的遊戲。下次就來試著製作一個 倉庫番:加入地圖格子、箱子、目標位置、推箱判斷,以及過關條件。