【Xcode 15】將我們綁在一起吧,伊莎貝爾 - Combine
最近台灣的總統大選剛選完,還真的是幾家歡樂幾家愁呢,無論結果如何,大家一起Combine,為了未來一起努力吧…話說,雖然Combine從iOS 13.0就開始支援了,但是那時的時空背景是要來取代Rx的,但當時的Rx可謂是如日中天,因為函數響應式(Functional Reactive Programming)的流行,加上Flutter雙平台開發越來越強大,使得APPLE不得不出個SwiftUI來應戰,在這時候Combine的應用在SwiftUI就非常的方便,當然,因為Rx系列是不能應用在SwiftUI上,所以就漸漸取代了RxSwift,成為面試的主流…
做一個長得像這樣的東西
作業環境
| 項目 | 版本 |
|---|---|
| CPU | Apple M1 |
| macOS | Sonoma 14.2.1 arm64 |
| Xcode | 15.2 arm64 |
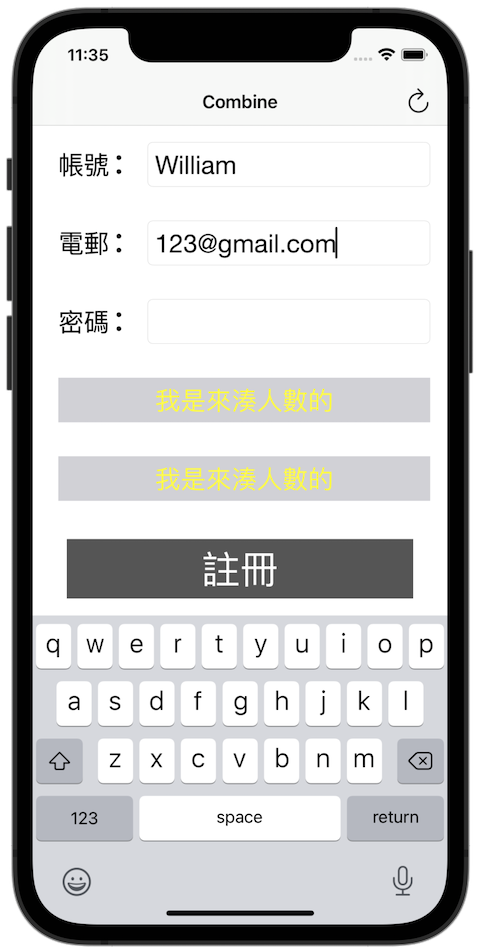
常用的使用者註冊功能頁
文字輸入
-
這篇呢,主要是個人學習Combine的入門範例,所以使用常見的使用者註冊功能頁來做範例…
-
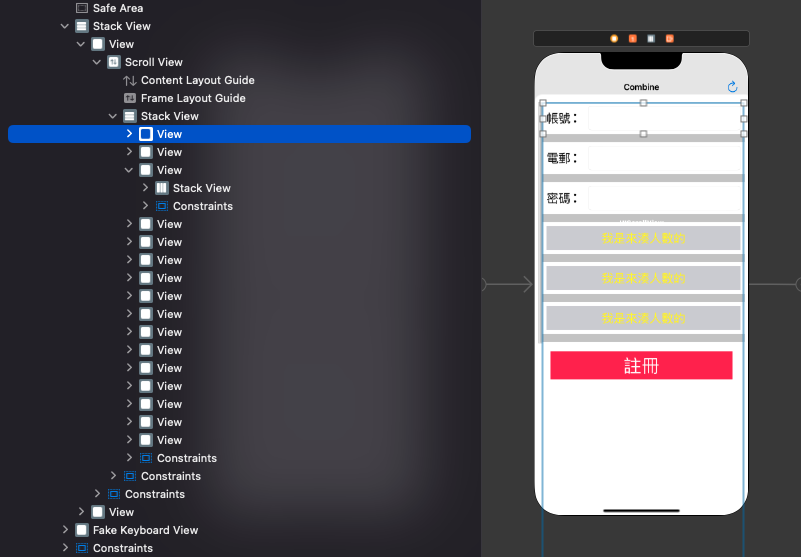
首先呢,使用UIScrollerView來模擬使用者註冊帳號的情形… 就是會有一大堆的資料要填寫,是個很適合使用Combine的情境,這裡只會把重點的Code標上…
-
再來呢,就照一般使用UITextField的方式一樣,在編輯文字的時候,把輸入的文字存下來…
// MARK: - 小工具
private extension ViewController {

    /// [初始化設定輸入框有輸入時的動作](https://blog.csdn.net/u013538542/article/details/134426757)
    func editingChangedSetting() {

        keyboardHeightConstraint.constant = 0

        let textFields: [UserTextFieldType: UITextField] = [
            .username: usernameTextField,
            .eMail: eMailTextField,
            .password: passwordTextField,
        ]

        UserTextFieldType.allCases.forEach { type in

            guard let textField = textFields[type] else { return }

            textField.delegate = self
            textField.tag = type.rawValue
            textField._editingChanged { self.storeInputText(with: $0) }
        }
    }

    /// [把輸入的值存起來 (單向:輸入框輸入文字 -> 存變數 / 正在輸入的注音不算)](https://www.swiftbysundell.com/articles/combine-self-cancellable-memory-management/)
    /// - Parameter textField: UITextField
    func storeInputText(with textField: UITextField) {

        guard textField.markedTextRange == nil,
              let type = UserTextFieldType(rawValue: textField.tag)
        else {
            return
        }

        switch type {
        case .username: viewModel.username = textField.text ?? ""
        case .eMail: viewModel.eMail = textField.text ?? ""
        case .password: viewModel.password = textField.text ?? ""
        }
    }
}
ViewModel - @Published
- 是不是發現一個叫viewModel的物件呢,這裡就是本篇的重點之一了…
- 跟一般的Model一樣,有變數,有函數…
- 但為了能在改變變數時,我們也能知道,這裡要繼承ObservableObject…
- 變數端加上@Published修飾字,當發射端…
- 簡單來說有點像NotificationCenter,有@Published修飾字的類似post功能 (發送);$<變數名稱>類似addObserver功能 (接收)…
final class ViewController: UIViewController {

    private var viewModel = RegistrationViewModel()
}

final class RegistrationViewModel: ObservableObject {

    @Published var username: String = ""                                        // 帳號
    @Published var eMail: String = ""                                           // 電子郵件
    @Published var password: String = ""                                        // 密碼

    var canRegister: AnyPublisher<Bool, Never> { return canRegisterRule() }     // 可不可以註冊
}

extension RegistrationViewModel {

    /// [清除](https://medium.com/彼得潘的-swift-ios-app-開發問題解答集/使用-preview-macro-定義預覽畫面-ios-17-新功能-bc850b2c11fc)
    func clean() {
        username = ""; eMail = ""; password = ""
    }
}

private extension RegistrationViewModel {

    /// [可以註冊的規則 (通通要有值)](https://zhuanlan.zhihu.com/p/150958669)
    /// - Returns: [AnyPublisher<Bool, Never>](https://developer.apple.com/videos/play/wwdc2021/10022/)
    func canRegisterRule() -> AnyPublisher<Bool, Never> {

        let rule = Publishers.CombineLatest3($username, $eMail, $password)
            .map { username, email, password in return !username.isEmpty && !email.isEmpty && !password.isEmpty }
            .eraseToAnyPublisher()

        return rule
    }
}
- 在這裡可以看到會使用viewModel.$username之類的寫法
- sink()就是把值接收下來,然後UITextField也就變成新的值了
- store(in:)就是它存成全域變數,不存不行喲,區域變數是會不見的…
- viewModel.canRegister的部分,利用CombineLatest3(),把3個變數合在一起處理,通通要有值才能註冊…
// MARK: - Combine
private extension ViewController {

    /// [清除輸入值 => 同時也會清除輸入框](https://onevcat.com/2020/06/stateobject/)
    func clearInputValuesAction() {
        viewModel.clean()
        view.endEditing(true)
    }

    /// [綁定ViewModel (單向:變數內容改變 -> 輸入框文字改變)](https://medium.com/jeremy-xue-s-blog/swift-使用-combine-處理-url-任務-8a48d0dc3b1b)
    func viewModelSetting() {

        viewModel.$username
            .sink { [weak self] newText in self?.usernameTextField.text = "\(newText)" }
            .onCancel { wwPrint("[onCancel] viewModel.$username") }
            .store(in: &cancellables)

        viewModel.$eMail
            .sink { [weak self] newText in self?.eMailTextField.text = "\(newText)" }
            .onCancel { wwPrint("[onCancel] viewModel.$eMail") }
            .store(in: &cancellables)

        viewModel.$password
            .sink { [weak self] newText in self?.passwordTextField.text = "\(newText)" }
            .onCancel { wwPrint("[onCancel] viewModel.$password") }
            .store(in: &cancellables)
    }

    /// [針對ViewModel數值改變時的處理 (註冊按鈕的顏色變化)](https://zhuanlan.zhihu.com/p/343631974)
    func viewModelActionSetting() {

        viewModel.canRegister.sink { canRegister in
            self.registerButton.isEnabled = canRegister
            self.registerButton.backgroundColor = !canRegister ? .darkGray : .systemRed
        }.onCancel { wwPrint("[onCancel] viewModel.canRegister") }
        .store(in: &cancellables)
    }
}
- 最後就是鍵盤的部分了…
- 在使用NotificationCenter.default.publisher來處理,鍵盤出現 / 鍵盤消失的事件…
- 在取得鍵盤大小位置等資訊後,再做畫面的處理,把畫面往上推…
private extension ViewController {

    /// [取得鍵盤相關資訊後的相關處理](https://medium.com/彼得潘的-swift-ios-app-開發問題解答集/swiftui-view-的生命週期影響-stateobject-state-儲存的資料-ffd4982fcece)
    /// - Parameter info: [Constant.KeyboardInformation](https://waynestalk.com/swift-combine/)
    func keyboardAction(with info: Constant.KeyboardInformation) {

        let isHidden = info.beginFrame.origin.y < info.endFrame.origin.y
        let curve = UIView.AnimationCurve(rawValue: Int(info.curve)) ?? .linear
        keyboardHeightConstraint.constant = isHidden ? 0 : info.endFrame.height

        UIViewPropertyAnimator(duration: info.duration, curve: curve) {
            self.view.layoutIfNeeded()
        }.startAnimation()
    }

    /// [鍵盤出現與否的設定功能 (有點像事件通知)](https://fatbobman.com/zh/posts/exploring-key-property-wrappers-in-swiftui/)
    func keyboardActionSetting() {

        NotificationCenter.default.publisher(for: UIResponder.keyboardWillShowNotification)
            .compactMap { notification in return UIDevice._keyboardInformation(notification: notification) }
            .sink { info in self.keyboardAction(with: info) }
            .onCancel { wwPrint("[onCancel] UIResponder.keyboardWillShowNotification") }
            .store(in: &cancellables)

        NotificationCenter.default.publisher(for: UIResponder.keyboardWillHideNotification)
            .compactMap { notification in return UIDevice._keyboardInformation(notification: notification) }
            .sink { info in self.keyboardAction(with: info) }
            .onCancel { wwPrint("[onCancel] UIResponder.keyboardWillHideNotification") }
            .store(in: &cancellables)
    }
}
URLSession
viewWillAppear / viewWillDisappear
- 接下來利用Segue轉到下一頁去
- 在這裡要注意的是,要在viewWillAppear(_:)的時候綁定,viewWillDisappear(_:)的時候解除…
- 如果沒有解除的話,帶到下一頁的值是會改變此頁的畫面的,比如說:下一頁有使用鍵盤輸入的話,第一頁也會有反應的,會把畫面往上推,大家可以試一試看看…
// MARK: - 使用者註冊頁
final class ViewController: UIViewController {

    private var viewModel = RegistrationViewModel()
    private var cancellables: Set<AnyCancellable> = []

    override func viewDidLoad() {
        super.viewDidLoad()
        initSetting()
    }

    override func viewWillAppear(_ animated: Bool) {
        super.viewWillAppear(animated)
        combineSetting()
    }

    override func viewWillDisappear(_ animated: Bool) {
        super.viewWillDisappear(animated)
        cancellables = []
    }

    override func prepare(for segue: UIStoryboardSegue, sender: Any?) {
        prepareSegueAction(segue, sender: sender)
    }
}
URLSession.DataTaskPublisher
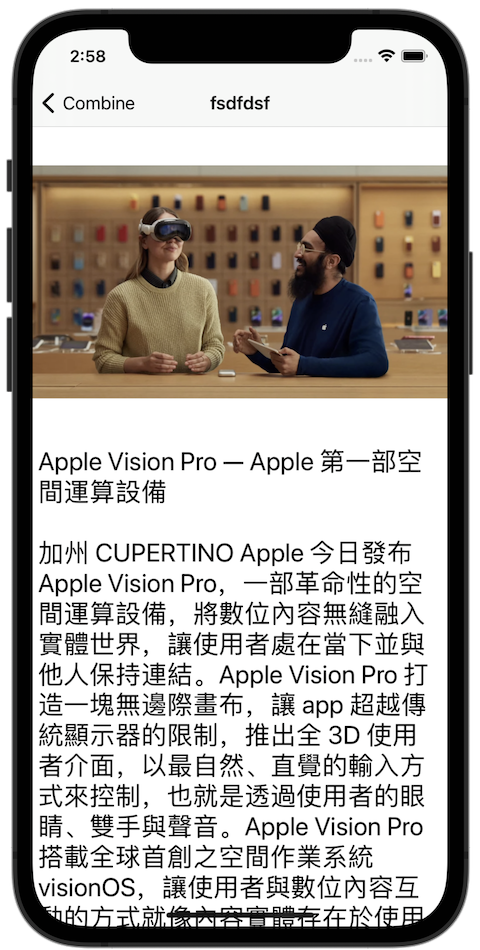
- 第二頁主要是使用URLSession.shared.dataTaskPublisher處理URL任務…
- 其中要注意的是retry()這個功能,做成有備用的URL圖片下載的功能,試了3次沒反應就換另一個網址…
import UIKit
import Combine
import WWPrint

// MARK: - 測試頁
final class NextViewController: UIViewController {

    typealias HttpOutput = Result<Data?, HttpError>

    enum HttpError: Error {
        case response
        case code(_ code: Int)
    }

    @IBOutlet weak var myImageView: UIImageView!

    var viewModel: RegistrationViewModel!

    private let imageUrl = (
        original: "https://i.ytimg.com/vi/TX9qSaGXFyg/maxresdefault.jpg",
        backup: "https://www.digitaltrends.com/wp-content/uploads/2023/06/WWDC-2023-Apple-Vision-Pro-1.jpg"
    )

    private var cancellables: Set<AnyCancellable> = []

    override func viewDidLoad() {
        super.viewDidLoad()
        initSetting()
    }
}

// MARK: - 小工具
private extension NextViewController {

    /// [初始化設定](https://medium.com/彼得潘的-swift-ios-app-開發問題解答集/ios-combine-學習參考資源-a0ac24f348d4)
    func initSetting() {
        title = viewModel.username
        viewModel.clean()
        downloadImageWithURL(original: imageUrl.original, backup: imageUrl.backup)
    }

    /// [下載網路圖片](https://lochiwei.gitbook.io/ios/frameworks/combine/publishers/urlsession.datataskpublisher)
    /// - Parameters:
    ///   - originalUrlString: [原始圖片URL](https://www.jianshu.com/p/157978e2f283)
    ///   - backupUrlString: [備用圖片URL](https://zhuanlan.zhihu.com/p/343631974)
    func downloadImageWithURL(original originalUrlString: String, backup backupUrlString: String) {

        guard let originalUrl = URL(string: originalUrlString),
              let backupUrl = URL(string: backupUrlString)
        else {
            return
        }

        URLSession.shared
            .dataTaskPublisher(for: originalUrl)                                                    // 將這個URL給dataTaskPublisher處理
            .receive(on: DispatchQueue.global())                                                    // 在global序執行
            .retry(3)                                                                               // 可以重試3次
            .print("[Download]")                                                                    // 顯示處理的訊息
            .catch({ error in return self.retryErrorAction(error: error, backupUrl: backupUrl) })   // 如果有錯誤的話,轉成新的dataTaskPublisher處理
            .tryMap { output -> HttpOutput in return try self.responseAction(output: output) }
            .sink { error in wwPrint(error) } receiveValue: { result in self.receiveResultAction(result: result) }
            .store(in: &cancellables)
    }
}

// MARK: - 小工具
private extension NextViewController {

    /// retry失敗後的處理 (下載另一張新的圖)
    /// - Parameters:
    ///   - error: URLSession.DataTaskPublisher.Failure
    ///   - backupUrl: URL
    /// - Returns: URLSession.DataTaskPublisher
    func retryErrorAction(error: URLSession.DataTaskPublisher.Failure, backupUrl: URL) -> URLSession.DataTaskPublisher {

        let session = URLSession(configuration: .default, delegate: nil, delegateQueue: .main)
        let publisher = session.dataTaskPublisher(for: backupUrl)

        return publisher
    }

    /// 處理取到Output而後的處理 (HTTPURLResponse)
    /// - Parameter output: URLSession.DataTaskPublisher.Output
    /// - Returns: HttpOutput
    func responseAction(output: URLSession.DataTaskPublisher.Output) throws -> HttpOutput {

        guard let httpResponse = output.response as? HTTPURLResponse,
              let statusCode = Optional.some(httpResponse.statusCode)
        else {
            throw HttpError.response
        }

        if (statusCode != 200) { throw HttpError.code(statusCode) }
        return HttpOutput.success(output.data)
    }

    /// 最後的結果處理 (網路連線正常,也有取得回應)
    /// - Parameter result: HttpOutput
    func receiveResultAction(result: HttpOutput) {

        switch result {
        case .failure(let error):

            switch error {
            case .code(let code): wwPrint(code)
            case .response: wwPrint("response error")
            }

        case .success(let data):

            guard let data = data else { return }

            DispatchQueue.main.async {
                wwPrint(Thread.current)
                self.myImageView.image = UIImage(data: data)
            }

            wwPrint(Thread.current)
        }
    }
}
範例程式碼下載
後記
這篇寫得很匆忙,也寫得很一知半解,萬事起頭難,啟動就成功一半,雖然學得慢,但總有一天也是會的嘛…